 |
 |
 |
 |
 |
 |
 |
 |
 |
 |
|
|
|
|
|
|
|
|
|
|
|
|
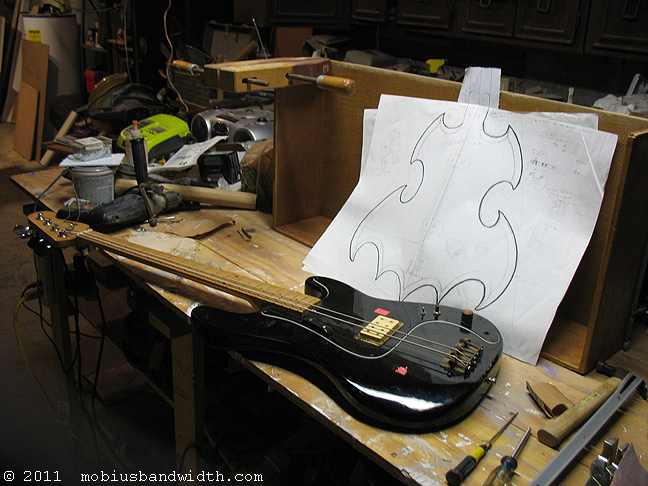
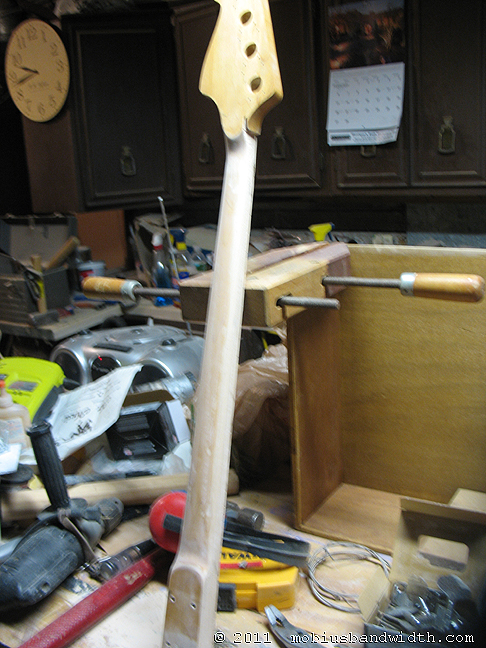
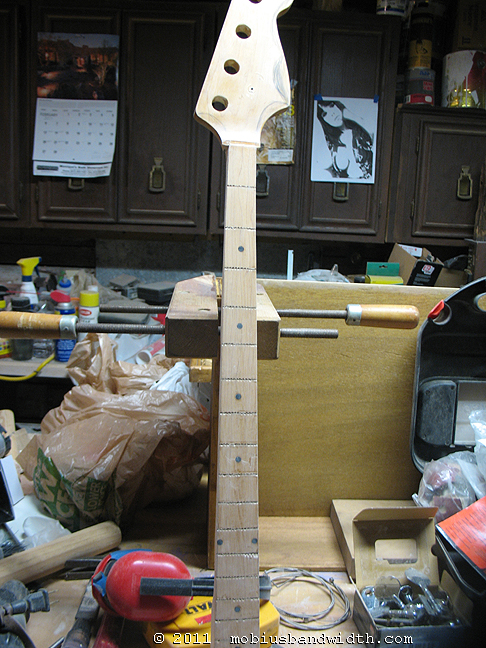
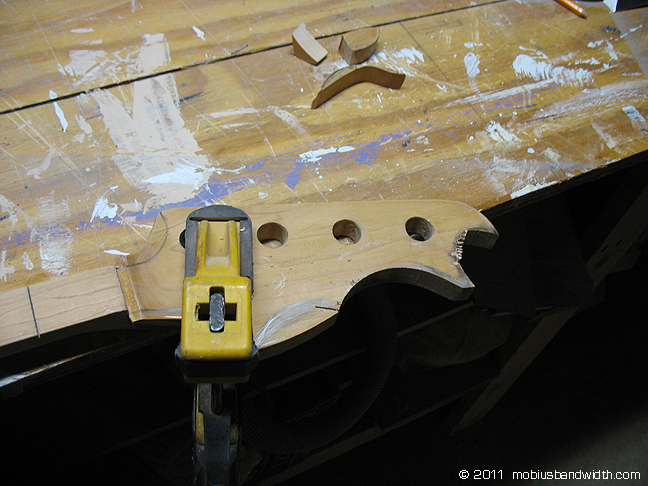
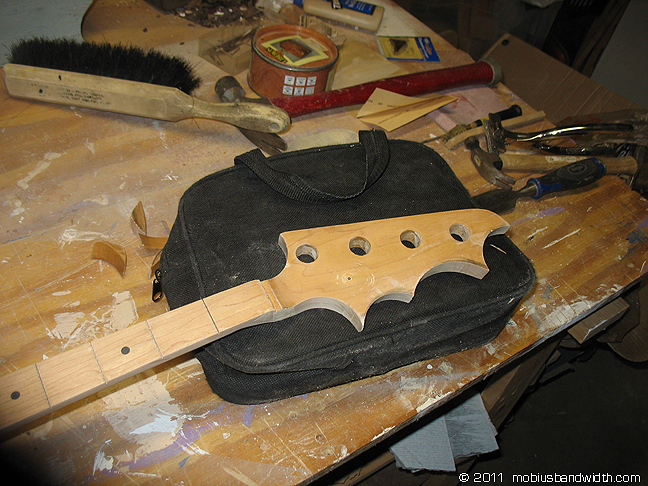
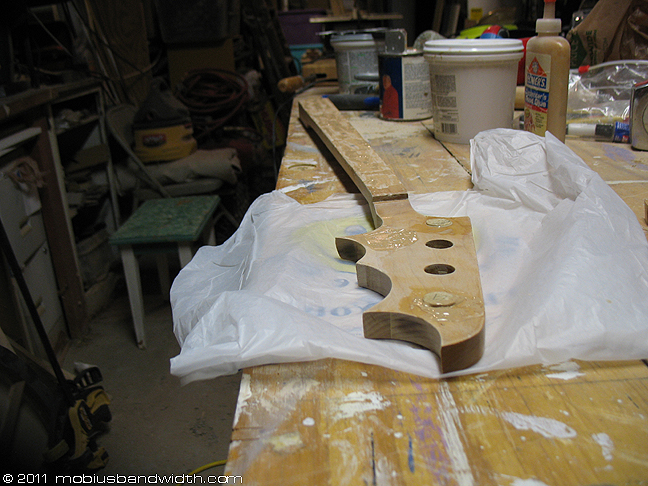
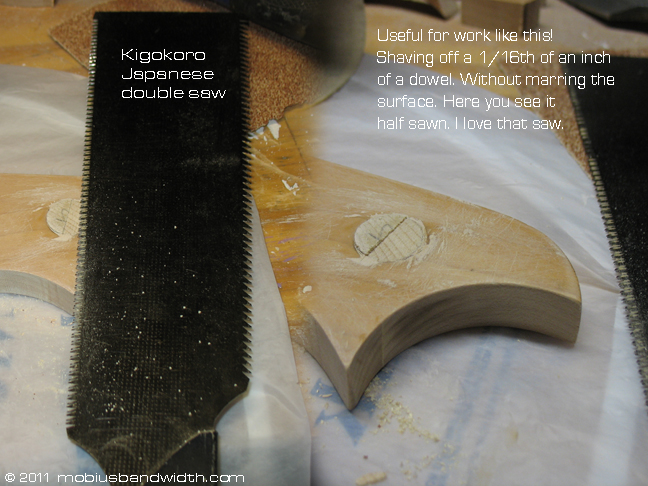
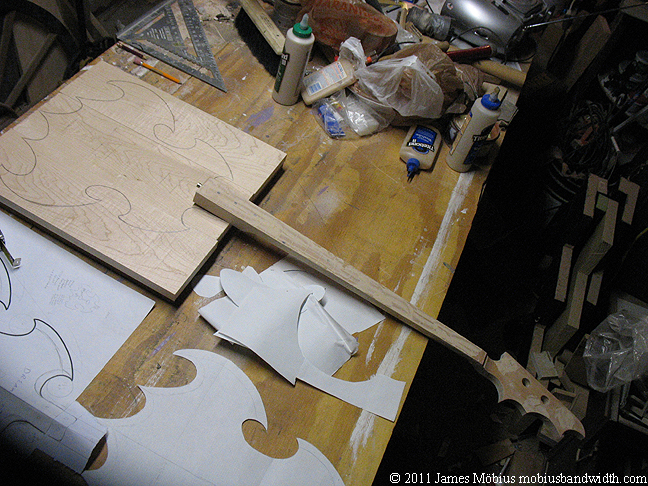
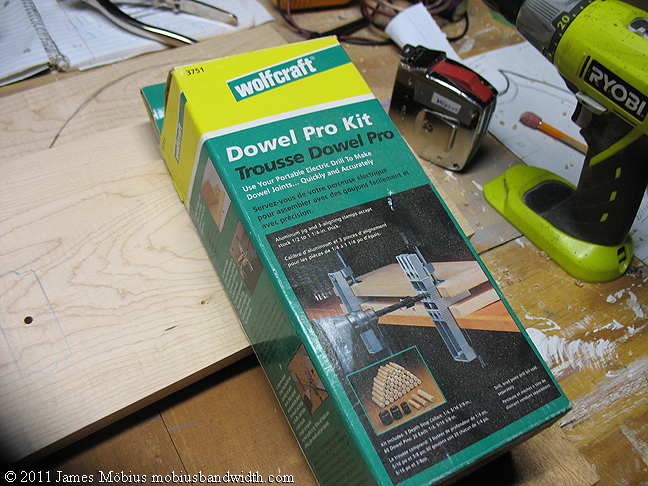
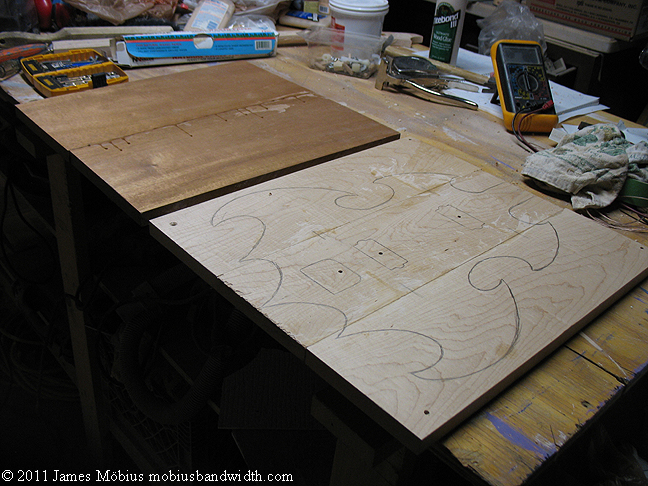
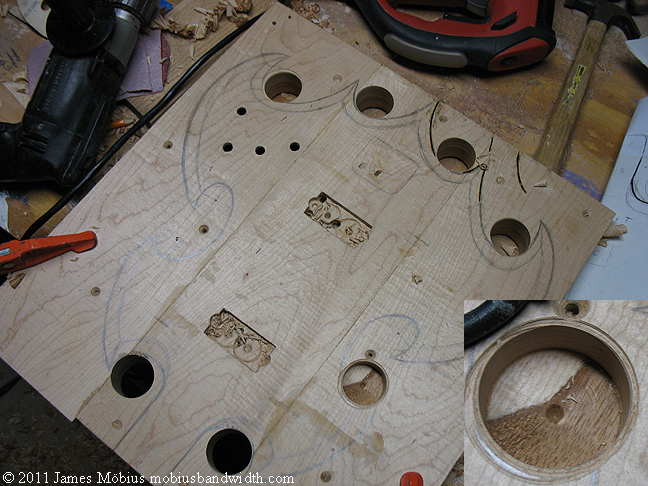
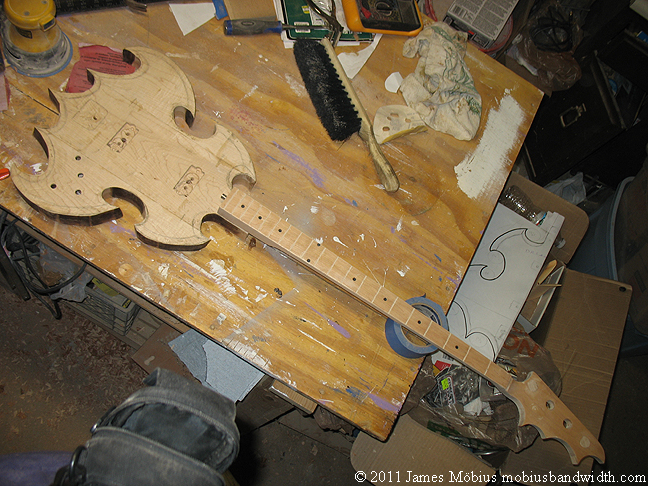
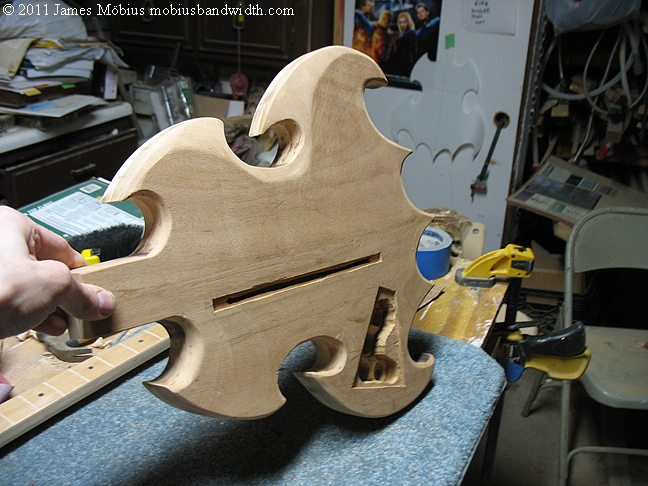
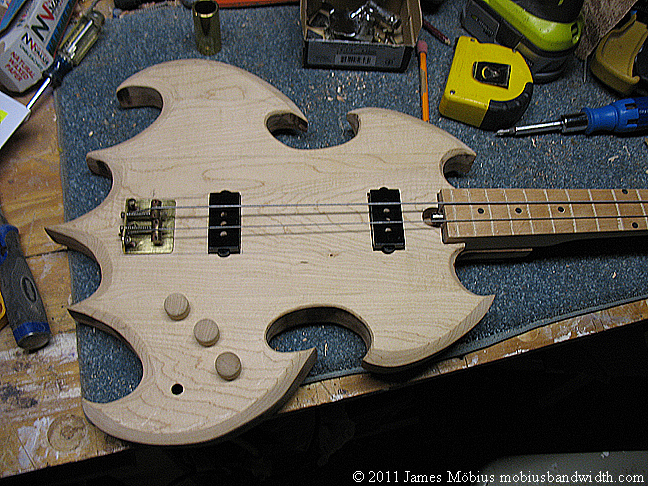
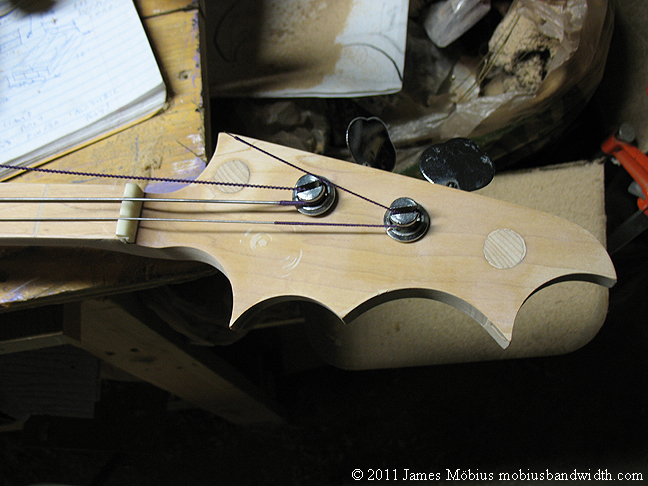
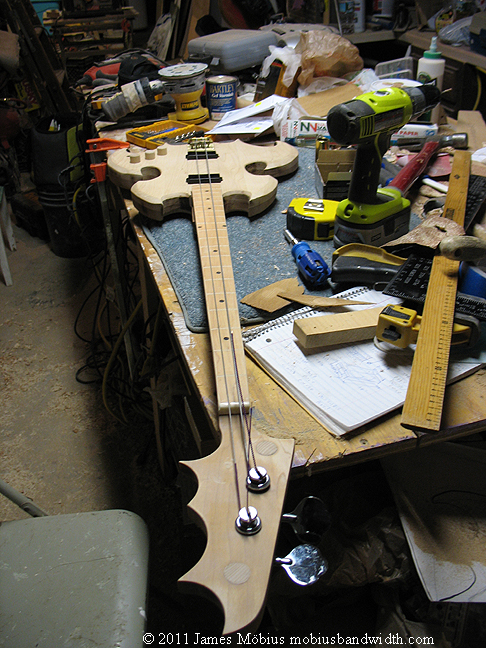
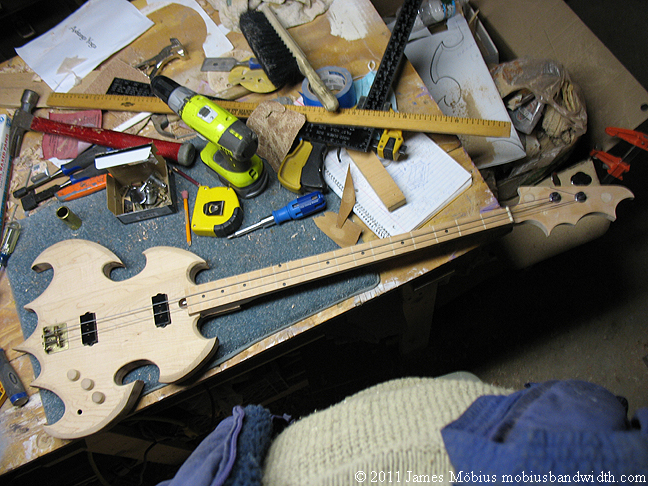
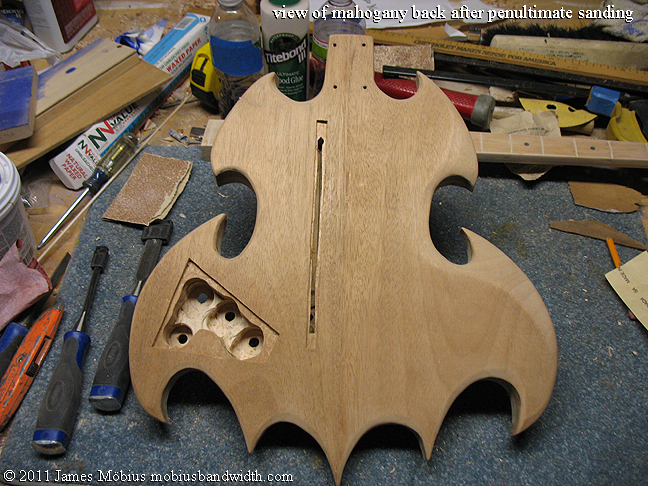
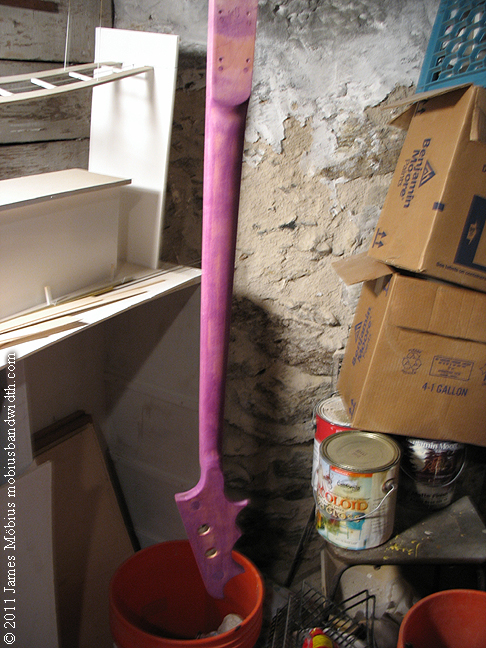
2-26-11 Update; happened to be near Rockler again today, looked at that purple heart wood again, but I can resist it. Didn't have my spec. notes with me so I couldn't actually buy any wood for the body, tho I looked at some maple and mahogany, I can get the mahogany there, but I think I'm going to look at Anderson McQuaid's maple before I decide about that. did pick up a birch 3/4" dowel to plug the no longer needed E and G tuning peg holes in the headstock. Also picked up a Seymour Duncan split pickup and Strat style jack and ferrule from Mr. Music. filled in the fret grooves with floor wood filler, and as you can see made my head shape modifications, it's looking very batwing like now. I was able to make the longest arc cut there in one pass with a jigsaw and did not need to sand it after, amazingly enough. Next phase; gonna buy me some wood! -And try to decide between a toggle switch pick up selector, and notched balance knob. I also need to figure out how high the nut will have to be to keep the action (string height off the neck) high enough to work well with the slide. I guess I'll ask Monique Ortiz.
 |
 |
 |
 |
 |
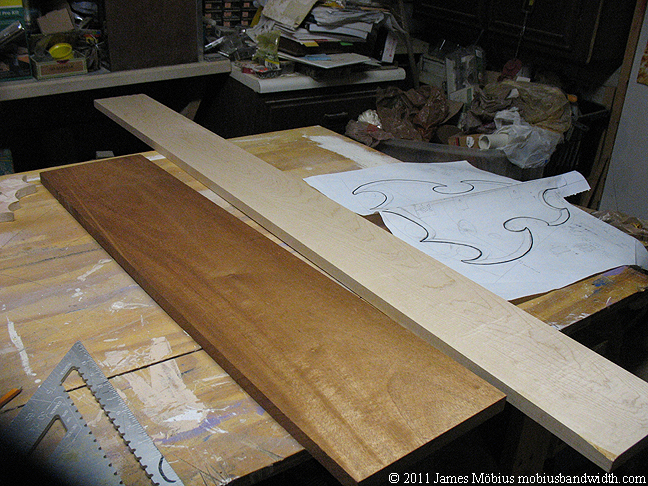
I then went back to Rockler and found a nice piece of mahogany which they were willing sell me half of. My original plan was to have the mahogany in 3 pieces, and the maple in 2, but this has been flipped, I thought that would have more structural integrity, but wood glue is pretty amazing stuff, I don't really have anything to worry about.
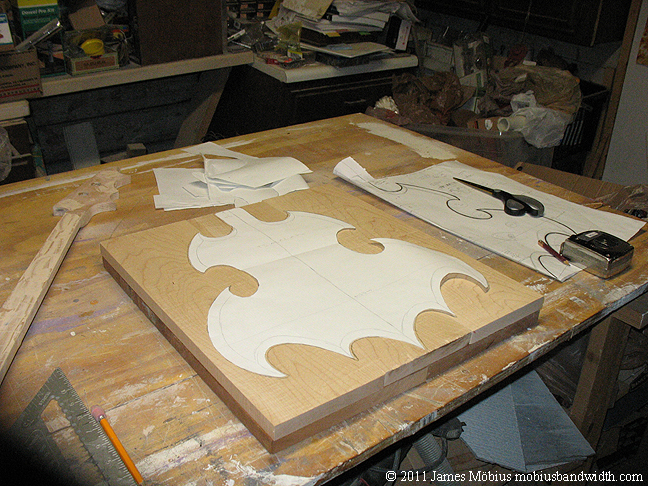
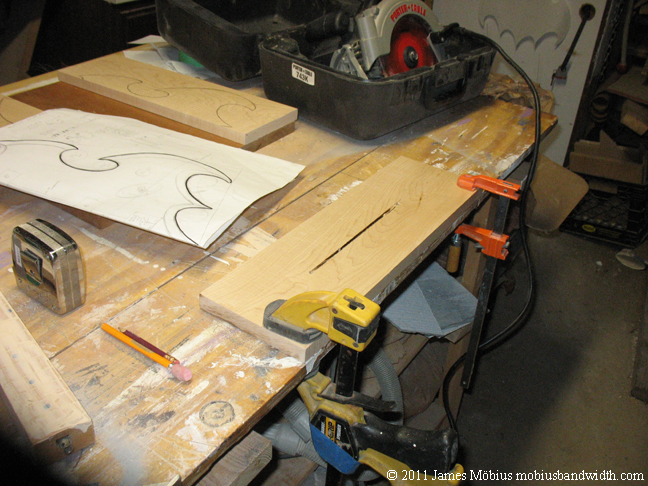
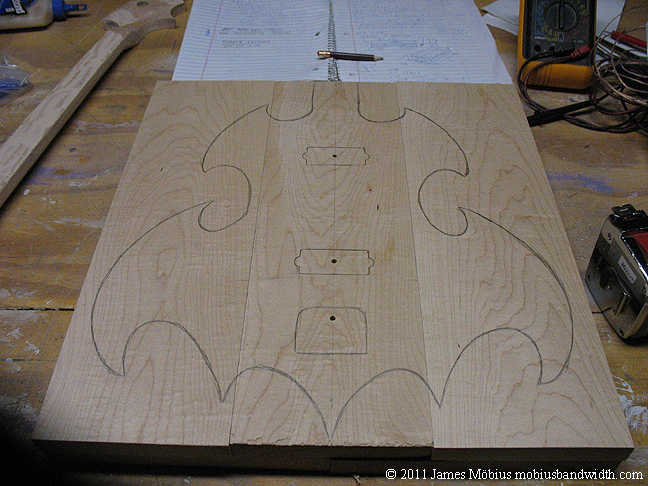
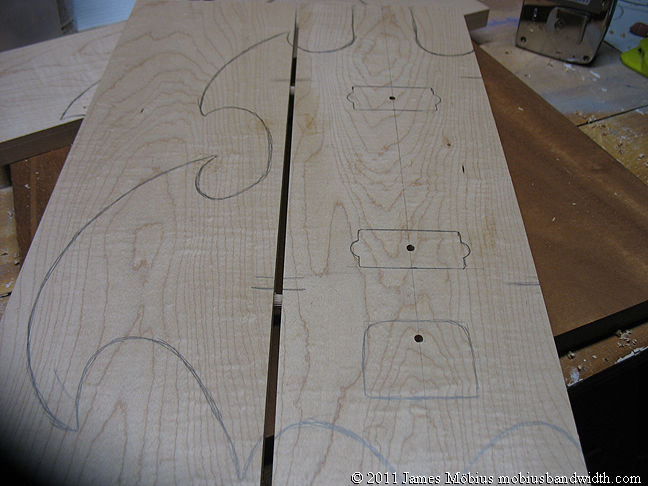
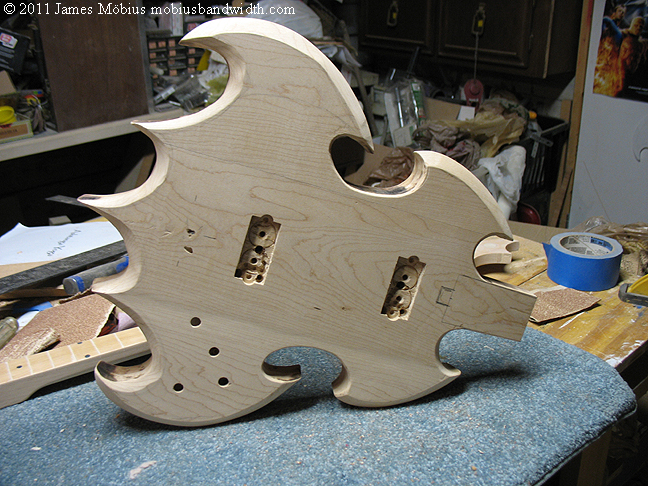
In this next photoset you can see the wood laid out, then chopped into 5 18" long segments and stacked as they will be when dowelled and glued. The template laid out and traced onto the wood, you can get a rough idea of what the whole thing will look like, with the neck laid on the body blank. I had to put some more wood filler on it and haven't sanded it yet. I drilled 3 holes through the center piece of maple for wiring, through the pick-up locations, and a ground wire channel for the bridge, then I flipped it over and in a feat of daring, (or dumbness), used my circular saw to rout a channel for the wire on the bottom of the piece. I can't adjust the shoe on that saw so I had to just hold it carefully as I ran it over the wood, eye-balling it to avoid making the channel more than 1/4" deep. I did pretty good and only had to chisel the ends. Had to make 2 passes as well since the blade is thin kerf (only 1/8th" thick) I thought I'd make the channel first so I won't have to drill it later, which was a good plan, but then I thought, what if glue fills the channel?
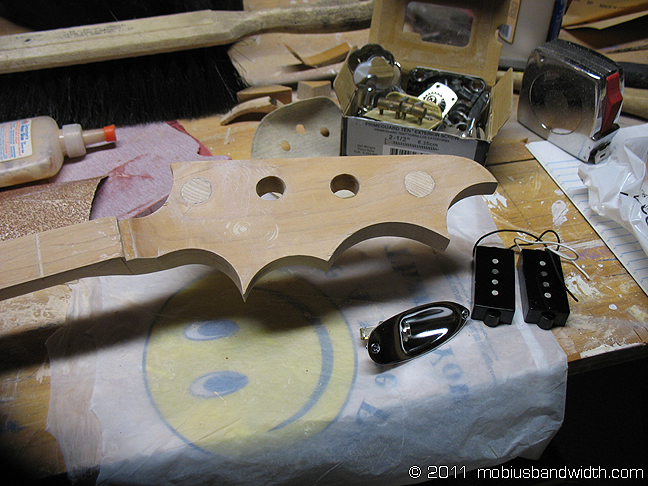
I know, I'll run the wire before I glue it and just leave it in there! Clever! And so I tested some wire for continuity, (to make sure it works) and started threading it, then I realised routing the cavities for the pick-ups would be very difficult to do with the wires in place, without harming the wires. I've had to cut through wood in house frames without harming live electrical wires before, and it's no fun. On this scale, with maple, a hard wood, it would not be any moreso. So I have to chisel and rout out the holes for all the guts before I glue a single piece of wood to another I think, including the input jack chamber. Have to open up one of my other instruments to get the specs for that chamber I suppose. I'll still thread some wires through before gluing. Also I still haven't bought a balance knob or pick-up selector toggle switch, which I'm leaning towards, without a preamp, a balance knob can cut the signal, and I always liked toggle switches. You can put a label on them that says "stun / kill"
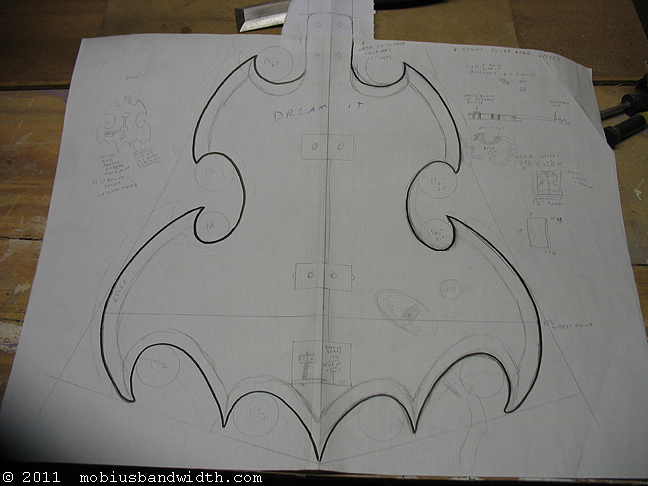
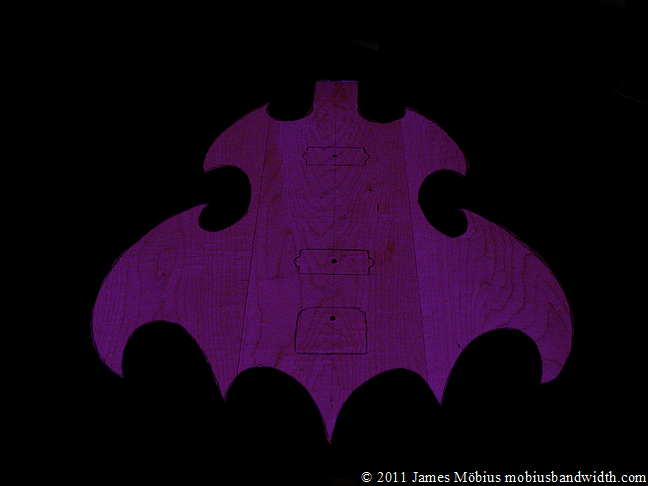
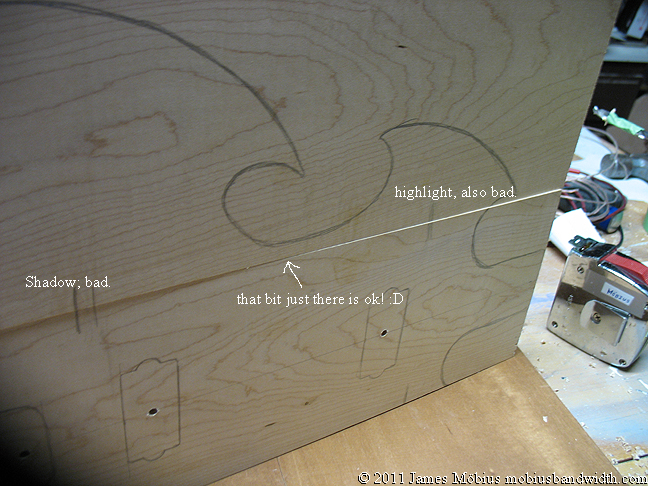
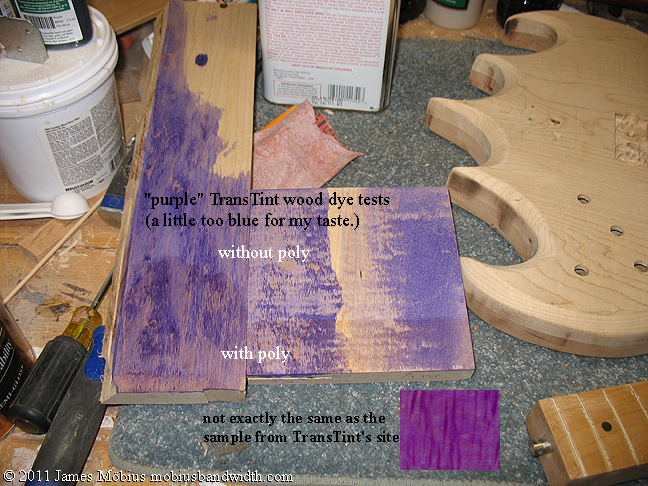
Lastly you can see the template clearly traced onto the maple, and I photoshopped it transparent purple to see how it would look that way. might have to get some more purple stain from Woodburst.com. oh crap their domain is for sale? hmm, apparently Rockler carries it though. I bought some of their stain for my mum's kitchen and still have some left over. He gave me a sample kit of different colours, as well as different browns with my order. Nice bloke. Googling around, here's a guitar someone used his stain on, mine will look like this but darker and less pink.
http://www.outdoorfunstore.com/images/album/woodburst5.jpg I might have enough left actually, and it just occured to me I could actually stain the neck as well. I was thinking of painting the front of the headstock black with red trim like the TV Batmobile. I'll experiment in photoshop first though before I do that. And test my stain on a scrap of maple before using it on the actual instrument. Purple maple, say that ten times fast! As they used to say on This Old House, "measure once, cut twice!" er, something like that...
Stay tuned for more exciting sawdust generating action next time!
 |
 |
 |
 |
 |
 |
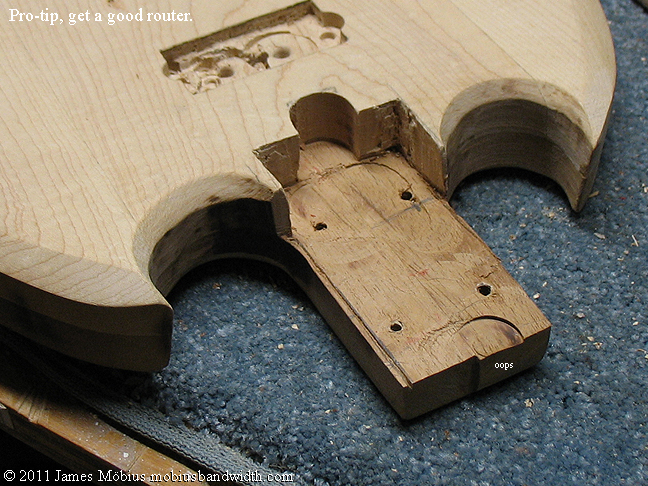
These pictures tell a story, which will be apparent to a carpenter, handyman or luthier no doubt, but which I will expound upon with no shortage of verbiage forthwith, a tale of far more horror and drama than one would expect one man could encounter alone in his basement workshop, with no blood being involved. but I'll let you see the pictures and then below them explain what went wrong today, although I managed to make it all work, since I'm cunning, clever and resourceful, (and incredibly, nay, incomparably modest and humble!), even, if not especially, in trying times.
 |
 |
 |
 |
 |
 |
 |
 |
 |
 |
 |
 |
 |
 |
 |
 |
 |
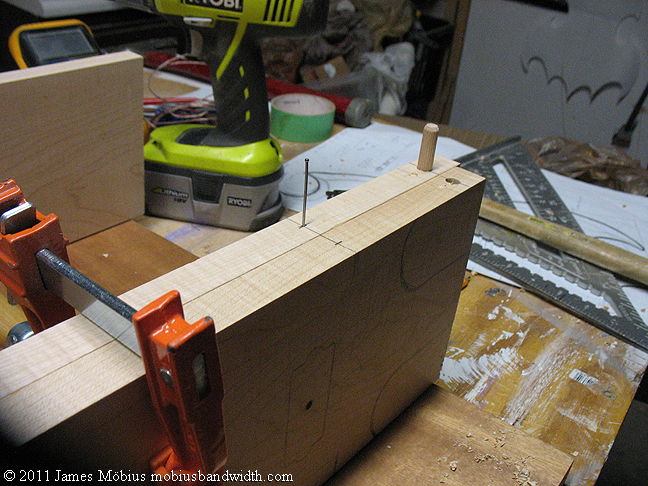
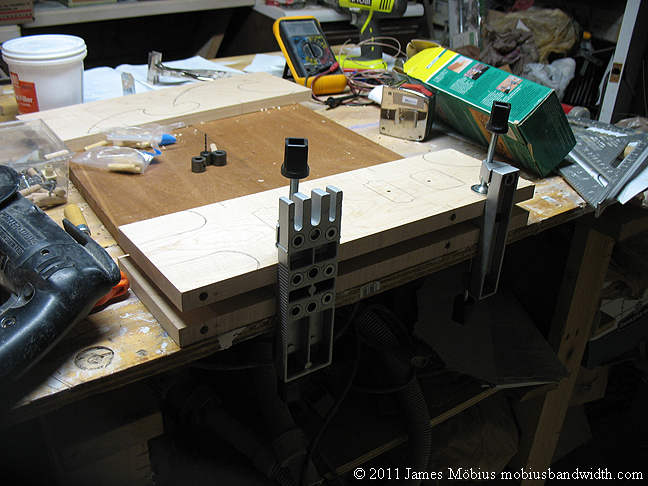
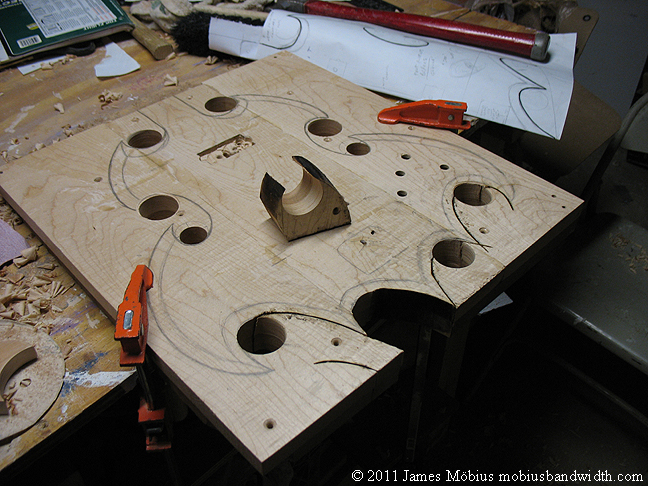
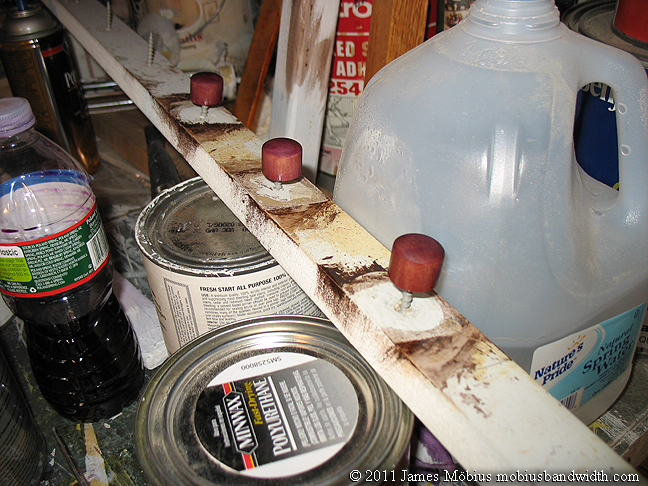
Today I decided to glue the maple pieces together, and the mahogany, but not to each other, that's the next phase. So, I had to drill for dowels. That's where the trouble began. Photo 22 shows how I carefully went that extra step for precision and clamped my wood together to draw a guide line, then measured very carefully to find the center, and used a pointy brad to make a small indentation exactly in the center of where I want my dowels to go, the point of the drill bit will rest in that hole before I start drilling, so the drill bit will start perfectly centered. Yep, that was the plan. I've done this before. the dowel in the back was a test on a part of the wood that will be thrown out, to make sure I could accurately drill for the dowels. the first try was not perfect, that's why I tried in an unimportant spot, but the 2nd try worked perfectly, that's where you see a dowel sticking up.
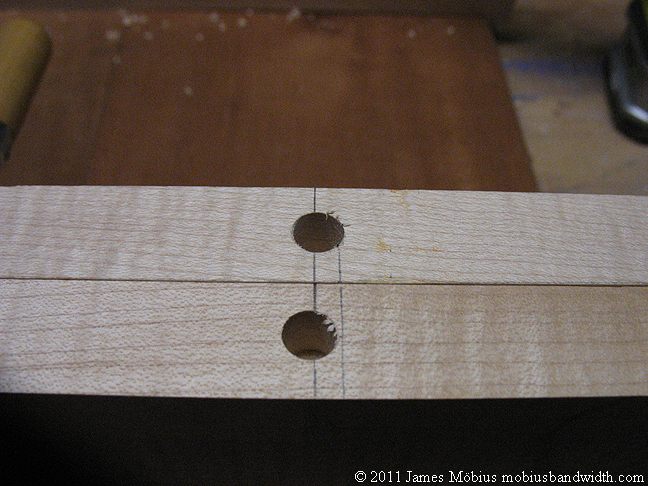
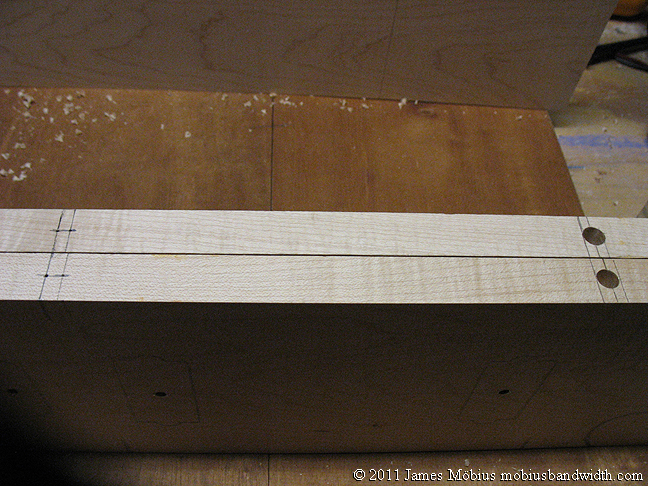
Photo 23 shows how I completely failed to allign the holes for the dowel on the next try. No worries, though, I simply moved the wood slightly, alligned the holes by making new pencil markings based off of them, and re-drew the lines for the 2nd set of holes, (fig. 24) as long as those allign with each other it doesn't matter if the whole piece of wood has shifted a 32nd of an inch, the outline of the bass won't be noticably altered and I can always move the pencil lines there too later. Onward and downward I traipsed.
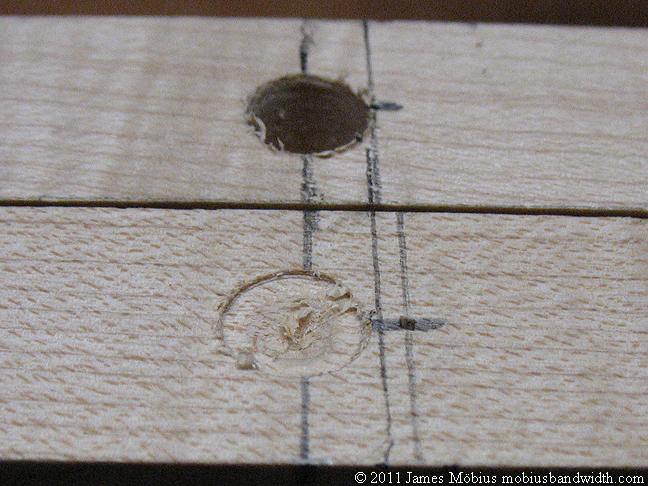
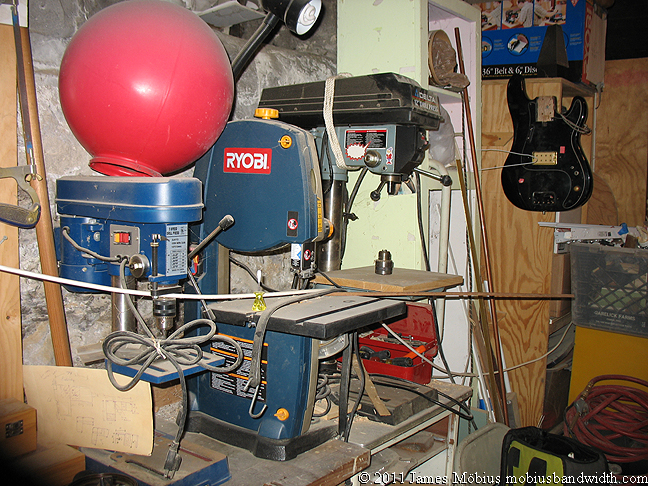
photo 25 shows that I have drilled one hole, and started the 2nd, pausing to check its allignment, I see it's off by a 32nd. Good thing I paused, I can still force the drill over, by angling it a little to move the hole, then proceeding straight down. This works nicely (a common trick). In case you're wondering why I don't just use one of the drill presses seen in photo 26, they are both now suffering from the same mysterious malady, the chuck has fallen off and there is no evidence of any sort, as to how it ever stayed on in the first place, no set screw, no cotter pin, no nothing. I have no idea what happened. Incidentally the $99 Ryobi band saw between them is less than awesome.
Photo 27 shows the dowels alligned and it fits together nicely. Photo 28 shows how wrong I am about that. Yes the dowels fit the wood together, but the 2 pieces of maple are not on the same plane. this is not ok. Fortunately, this is why one does dry fittings before gluing. I don't want to have to drive to my brother's house to use his wood planer. This bass is already going to be a little thinner than many.
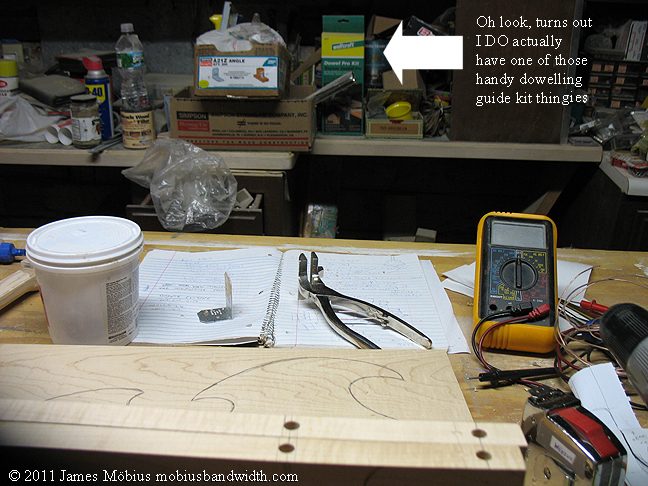
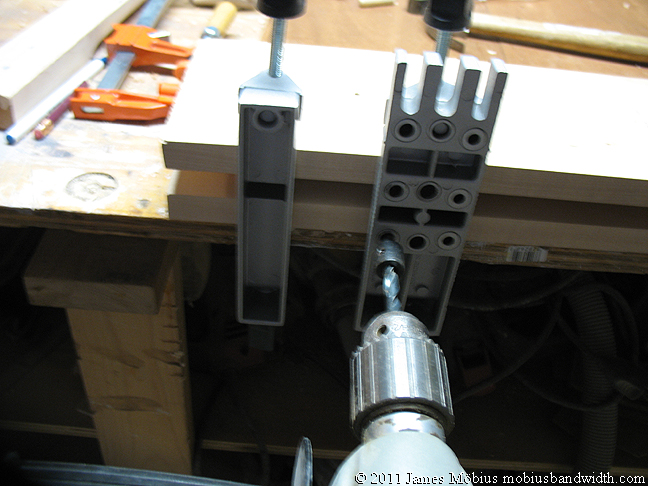
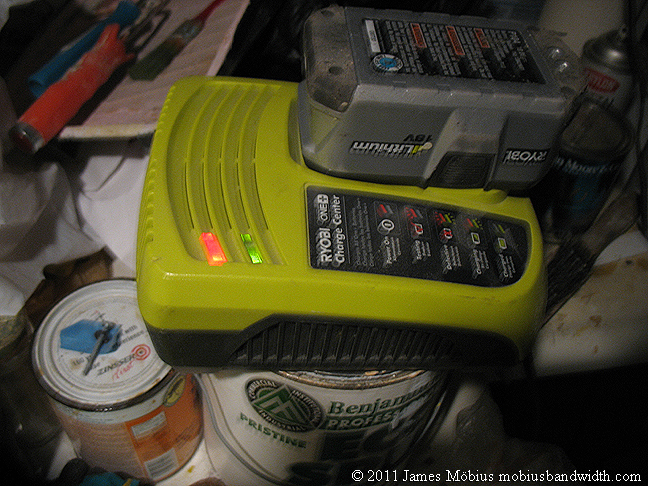
So there I am, looking down at my misalligned holes, thinking, if only I had a dowelling guide kit. It seems to me I used to have one, or maybe that was something I'd borrowed from my brother in the past. but I guess I'll have to go borrow his or buy one. Then I notice mine, directly in front of me. I swear I looked all over for it before because I remembered using one in the past. Feeling simultaneously daft, and rather pleased with myself, I set it up. No instruction sheet, ah, they're printed on the side of the box. pretty simple. Just as I drilled the last hole, the lithium battery died on my Ryobi cordless drill, and my spare battery vanished after a gig, along with the flashlight they fit into, on Halloween. (I do lighting and used the flashlight for tech work.) fortunately I have my trusty American made Porter Cable drill, so powerful it once threw me off a ladder and seriously messed up my thumb. I only use it when I need its brute force, though for years it was my only drill and I got by ok. It has no autostop brake, unlike cordless drills, so it doesn't stop suddenly when you release the trigger.
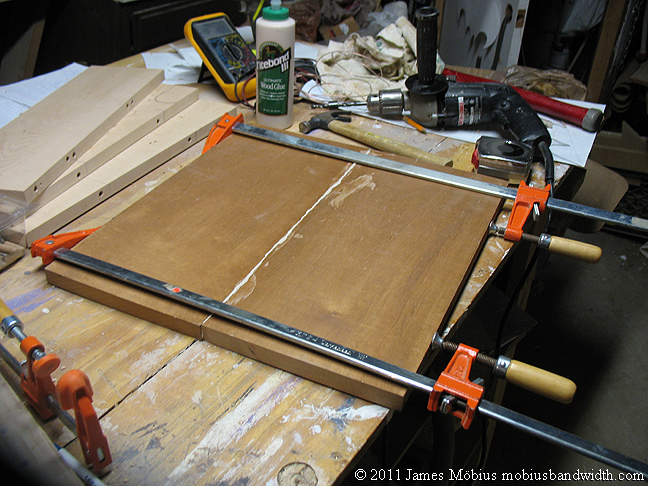
I drill all the holes in the maple and mahogany, and drill right over the messed up ones as well, I don't want empty chambers so I plan to fill them with glue and dowels as well, but not count on them, that side will have a couple of extras. I glue dowel and clamp the mahogany with no problems whatsoever. Finally things are going smoothly. (see pic 33) Checking in on my charging battery, it says faulty battery. Great, that's $90 to replace. (Turned out to be dirty contacts though, fortunately.)
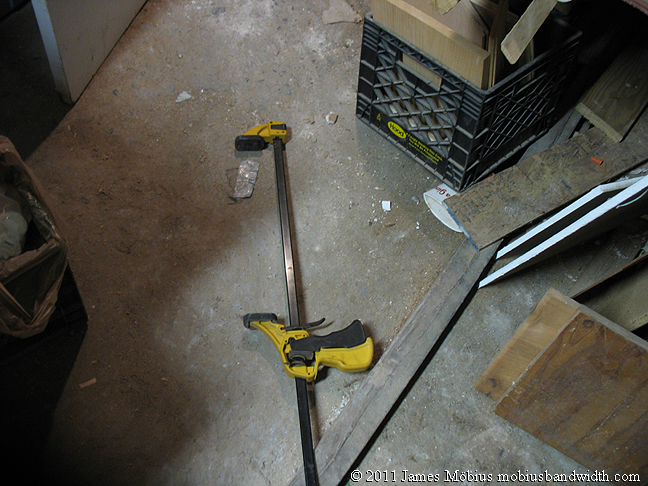
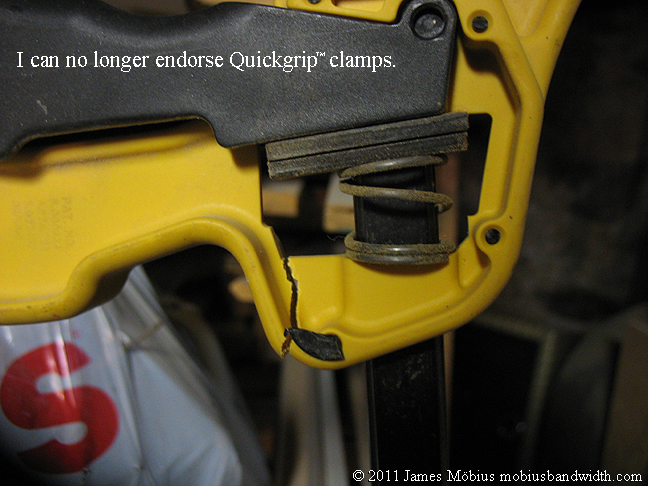
Then I start to glue the maple, a little trickier because it's 3 pieces to glue all at once, I could do them one at a time with my small clamps for the first 2 pieces, and the larger clamps once the mahogany is dry, but I have some huge clamps, so I'll just use those. I fit the dowels in (put glue in the holes first, kids!) and hammer it all together, and then discover that one of my large clamps is in fact broken and no longer intersted in clamping anything. I throw it on the floor, and I seriously never do anything like that, I'm very even tempered, but I've been under a lot of stress lately, and I don't need yet another thing to go wrong.
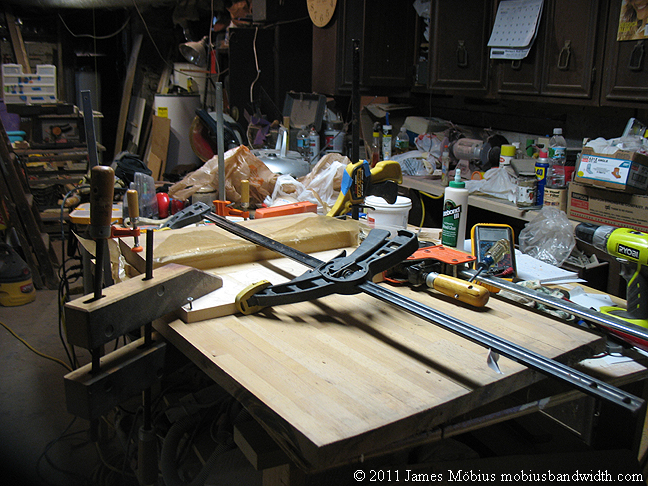
So I start clamping the maple with my largest clamp and the wood is squeezing together pretty well, glue squishing out of the seam, which is what one wants, and the whole thing is bowing terribly and starting to look from the side like this: \_/ (only not quite that bad) instead of like this: --- . I used Titebond-3, which has a longer working time than other glues, so I try not to panic, as I look around to see what I have. I ended up grabbing some wax paper, always have some handy, an old Ikea maple counter top remnant and part of an old cutting board, I wrapped the maple in wax paper so it didn't end up getting glued to the other wood.
I sandwiched the maple in the other wood and clamped the hell out of it so I could squeeze it together, while keeping it flat. I tried using a hammer to trick the broken clamp into working, which actually worked a little bit, but didn't end up using it. picture 36 shows the frankensteined clamp assembly I threw together in a mad race against time. I now had it nicely flat, but noticed a gap where I did not want one, along one of my glued dowelled seams, so I had to unclamp some of the side clamps to free up the big one, moved it over, squeezed the side that had a gap together, and put the other big, and less powerful clamp next to it, additionally I drilled some holes and screwed it all together, which took some time as I had to use my corded drill, with no quick change bits, just an old fashioned chuck with a key, put in a drill bit, drill a hole, change the bit to a driver, put a screw in, take the driver bit out, put the drill bit back in, repeat, 4 times, while moving clamps out of each other's way, it was just a wee bit stressful. Using screws as temporary clamps isn't always a luxury one has, but since some of the wood will be cut away, I was able to do that in the corners.
I looked back at the mahogany wistfully. That was so much easier to glue. As for the broken clamp, save that piece of crap for parts? Sure! not buying another one of those though. well, not for luthiery anyway. still useful in framing and fixing furniture I suppose. I had 2 more 2' quickgrips but they have vanished. looks like I should go clamp shopping before my next guitar. incidentally, my next musical instrument project, aside from remaking the saddle on the Bouzouki, will be a standard (tuned) electric guitar, with an original body design, and another recycled neck. This one with an amazing story behind it.
Stay tuned for more adventures in luthiery!
(actually now that I think of it, I ran my finger along the seam on the mahogany, and it wasn't perfectly alligned. may have to plane that. >.< probably warped a bit. I'll solve it somehow, I always do.) (I was able to chisel and sand that out, once glued, it'll be fine.)
 |
 |
 |
 |
Next to do, borrow a strat unless I have an instrument with an angled strat style jack ferrule, which actually I think I probably must, hang on, ah yes, my Hagstrom basses have them, open that up to see exactly what the channel for that bit of hardware should look like. Then I have to finally decide on switches and knobs. I might look into mini knobs. I want to keep it as simple as possible, Bob, my band's guitarist and recording engineer urged me today to have tone and volume knobs, in which case I won't need a toggle switch, so I'll probably go with standard 2 volume knobs, and one tone, all passive. (No preamp, no battery). I should probably resign myself to installing an access panel on the back so one day when this thing needs to be rewired, no one is cursing me about how hard it will be to rewire. Especially since that someone could be me.
Once I've sorted out the chambers for the guts and how best to access them, I glue the 2 halves together, cut out the body, bevel it, ( that will be a lot of work!) sand, sand some more, sand more still, stain and finish the body and neck, bolt the neck on, wire it up and fire it up! I can't wait to play this thing! will probably realistically be a couple of weeks before that happens. If not longer. I can only work on this in my spare time and I'm really trying hard not to hyperfocus on any one project at the exclusion of everything else in my life, like work, tattooing, sleeping, paying bills, etc, which with my A.D.D. I have historically found it easy to do. Well, onward and upwards!
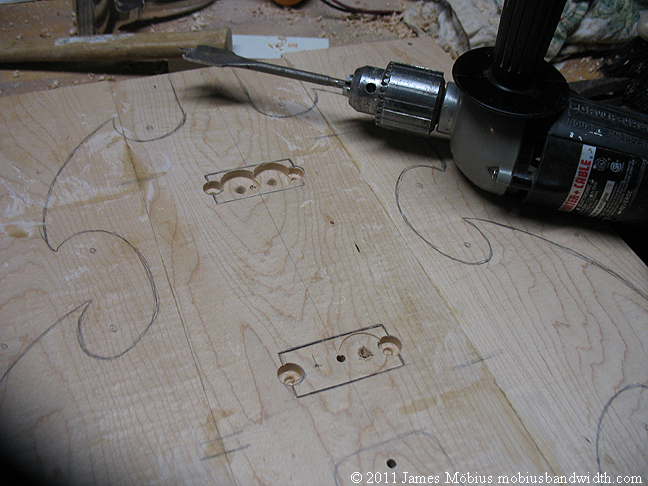
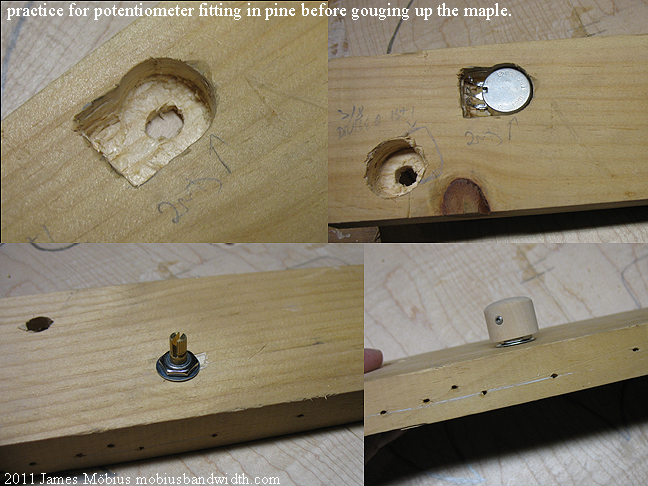
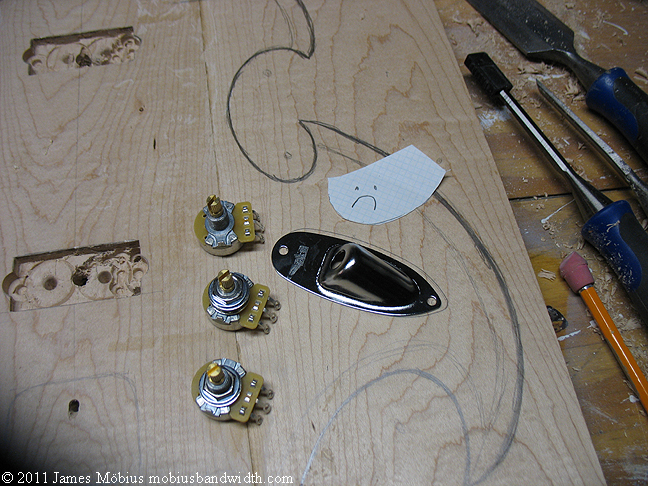
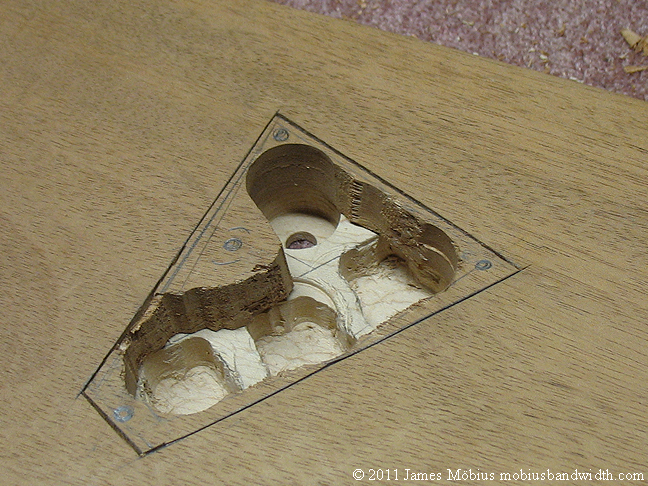
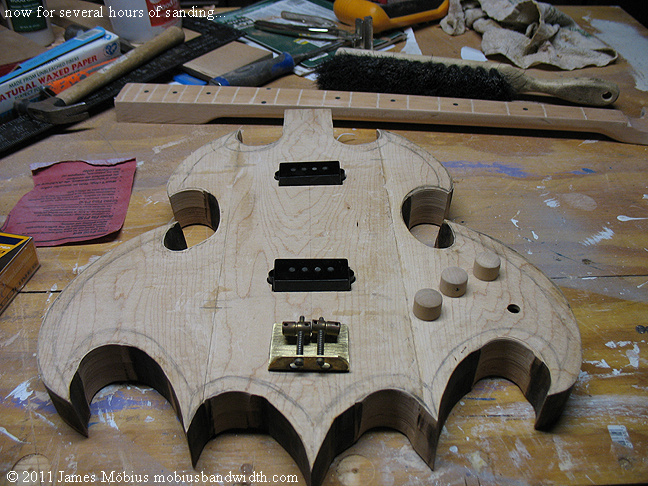
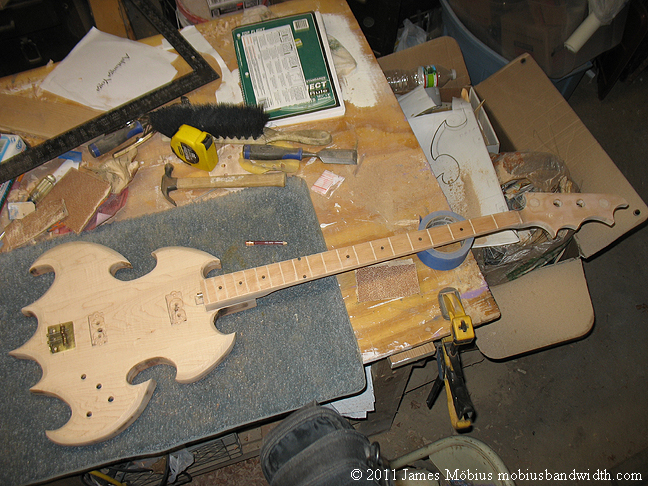
Before making room for them in the maple, I did a practice run in a piece of pine to figure out exactly what size chamber I'd need. Not a bad decision, tho I didn't mess anything up on the practice run. After the hassle of gluing the maple, I'd rather not have to buy more maple. Satisfied with the proof of concept there, I tried to plan the layout and realised there isn't really room in the body design for a strat style angled input jack, I'm not fond of flat face positioned jacks, but I didn't want to deal with trying to run it in through the side since the 2 halves aren't glued together yet and I don't know after bevelling them, how much surface there will be on the edges, even though it would have been nice to put it there, as I did on the first bass I built. Perhaps I'll use that jack plate on the next thing I build, but I would have ended up with my pots all right near a glue seam, which while theoretically is not a problem, just didn't feel right. I'll have to get a cable with an L shaped plug on one end just for this bass.
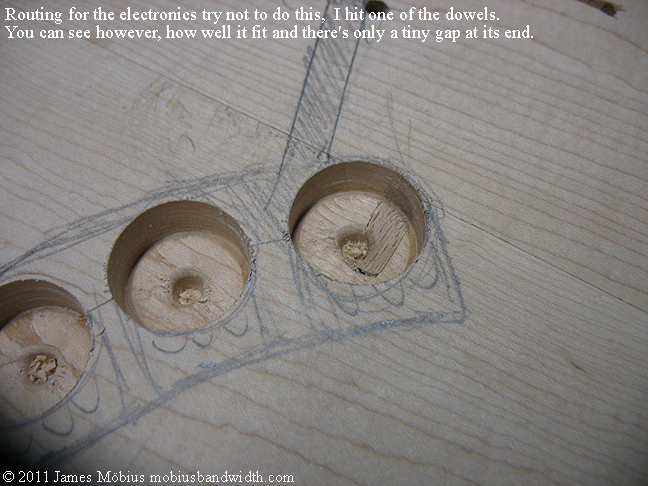
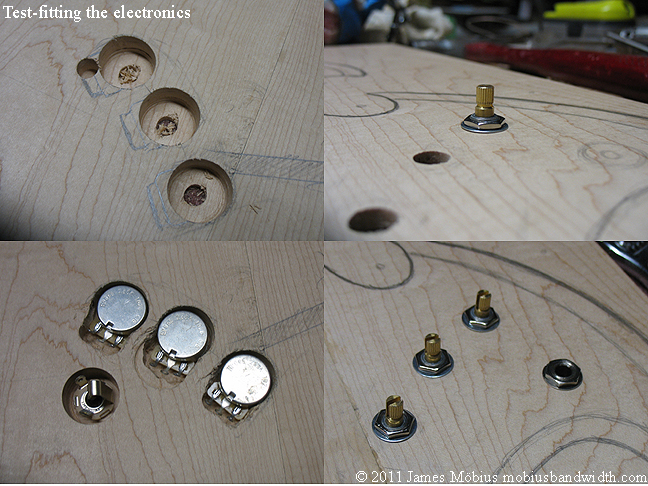
So I planned my electronics layout and as it happens hit a dowel. Not a structural tragedy, but something I should have been able to avoid, had I planned better. Live and learn. There's another dowel on that seam, and the mahogany seam will be several inches offset from that one anyway, so that's like one giant dowel. Sort of. Drilling for the pots was a little hairy with no working drill press, I just eyeballed it and went slowly, managed to keep the maple as thick as possible where the stem of the pot sticks through, hard to imagine it breaking there. I shaved down some pegs from the posts so I wouldn't have to drill for them, and didn't need to since I kept the chambers tight and close to the shape of the pot. Good thing I had a one inch Forstner bit on hand. Thought I was going to have to buy one, then I noticed I had one. Really must tidy up more.
 |
 |
 |
 |
 |
 |
 |
 |
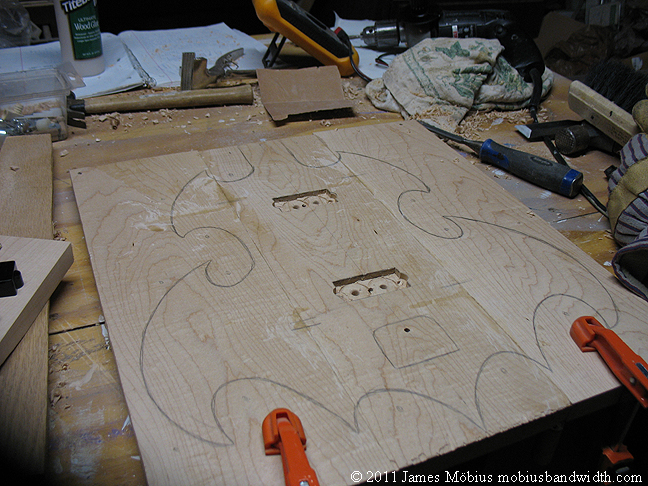
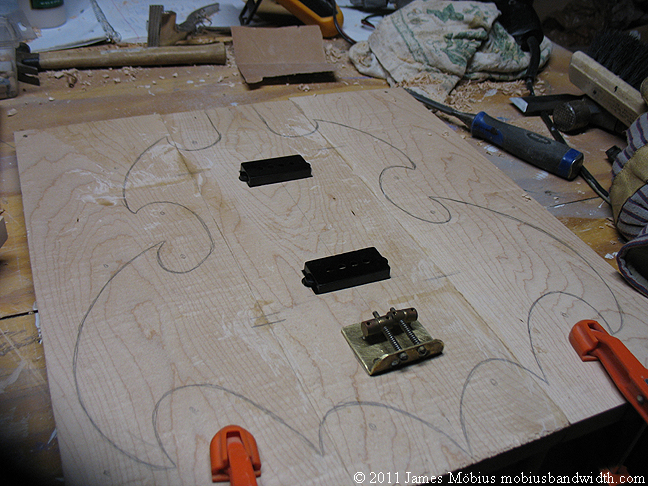
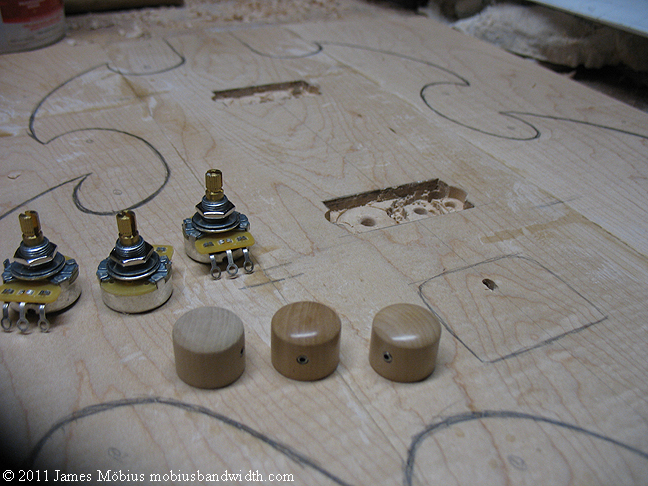
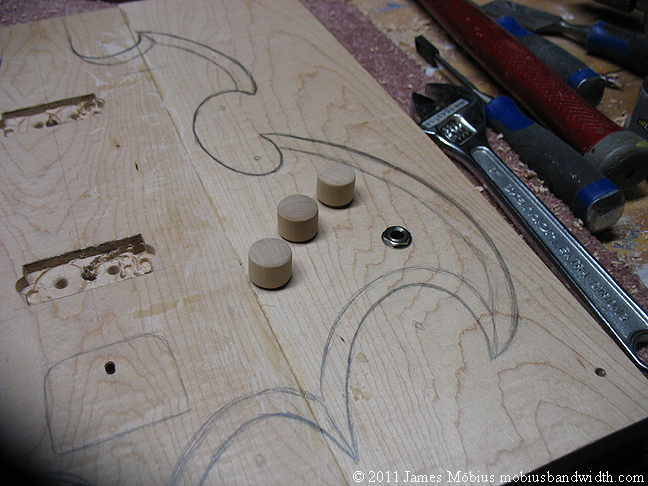
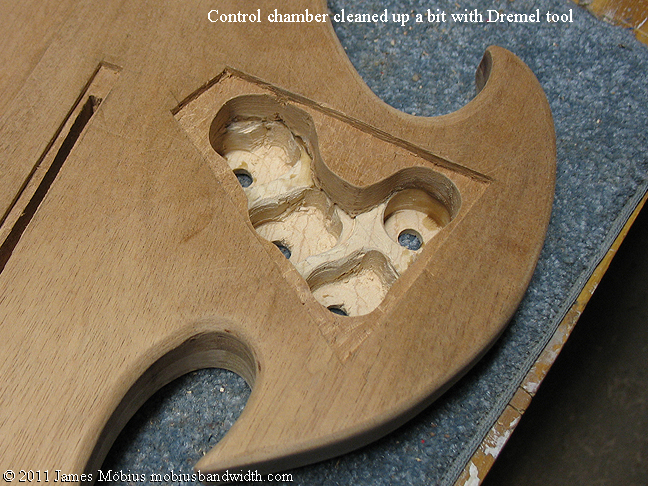
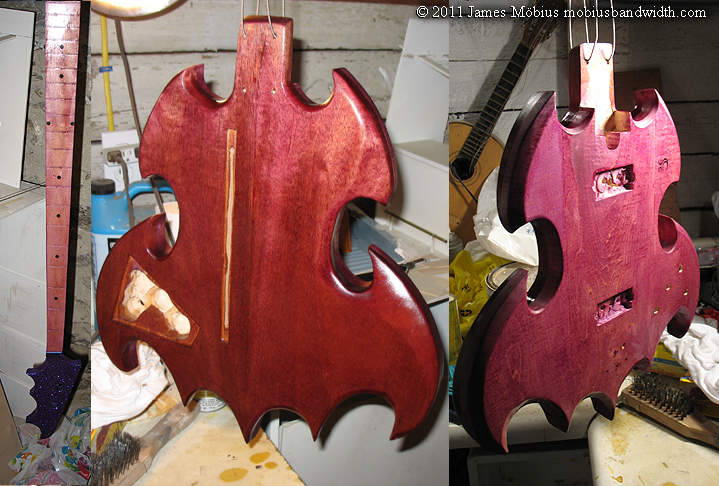
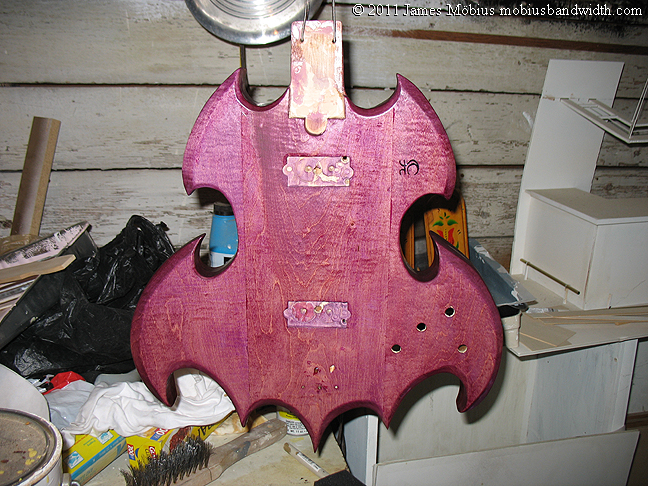
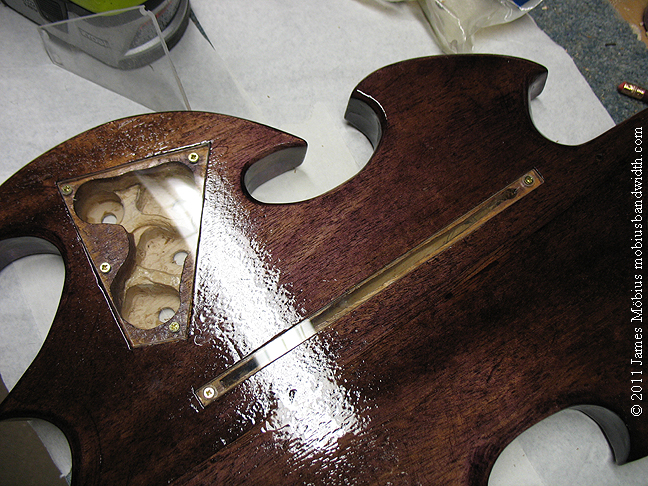
In the 2nd to last pic here you can see the wooden knobs test fitted on the electronics. I might actually grind the pot stems down a little and shorten the wooden knob covers so they don't stick up so much. On the other hand, I probably will make a block to elevate the bridge a 1/4th of an inch up, the action is going to be very high on this bass, that's why the pick up chambers are so shallow, I'm not sure I needed to carve those at all actually. Lastly I realised I was going to need 2 access panels on the back, so I started cutting those in, one behind the guts, I'll have to make a panel cover for it, I think from wood probably, another not shown here, will be long and thin to access the wires should they ever need to be replaced. Fishing them through once it's glued up would be close to impossible otherwise. Hmm. I might re-think that actually. Trying to keep from carving this thing up too much. Oh and I still need a 0.5 microfarad capacitor. I'm fresh out. And I need to find a hunk of brass somewhere for the nut.
I also drew the bevel indication lines on the top, you'll notice the bevel does not continue through the waist of the instrument, this is because I'm not that much of a masochist.
So close to gluing the maple to the mahogany so I can start shaping the body, I can't wait! Next: need to get a string-tree, probably cobble one together from something... stay tuned, same bat time, same bat web page!
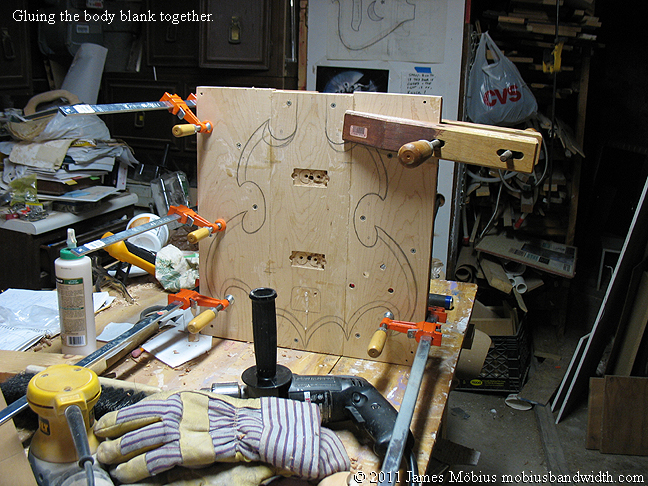
3-8-11 update. Hand-chiselled mortises for the rear access panel cover plates, not sure if I'll make the covers our of wood or not yet, leaning that way, but well see. decided to use screws as clamps and glue the 2 halves of the body blank together. This might have been a good idea, I'll find out! I think it will work. I used clamps as well, just thought some screws couldn't hurt, the project is an experiment start to finish anyway.
I needed screws so I could be sure of allignment, so I thought. maybe I needed more sleep. I predrilled and countersunk a bunch of screws, they all go through wood that will be cut away, not through the body itself, dotted around it like rivets, but I should have clamped it first and added the screws as extra, one of them was not going in right, the wood was not tighly compressed on one corner, I couldn't clamp it without taking out the screw, and the screw stripped out. pliers wouldn't take it out so I sawed off the corner on the mahogany side to defeat the screw, loosened up some of the other screws, clamped it and retightened the screws.
I spent a long time thinking about the channels for the wires, test fishing wires through them with the halves screwed but not glued together, before deciding to have a slit in the back to make future rewiring easier. sort of holding my breath that there won't be any gaps between the layers of wood when I unclamp it tomorrow. should be fine, I used plenty of glue. I like to worry, apparently. :p
Now the real work begins, cutting out the outline, bevelling the edges and sanding the hell out of it. Starting to have flashbacks to high school when I built my first bass, the shop gear kept breaking down, causing delays. seems familiar. couldn't get my old router apart today to change bits, and last time I tried to use the better one, it spat a deadly bit across the room when I turned it on, luckily I faced it away from me. I know what I'm doing, honestly!
 |
 |
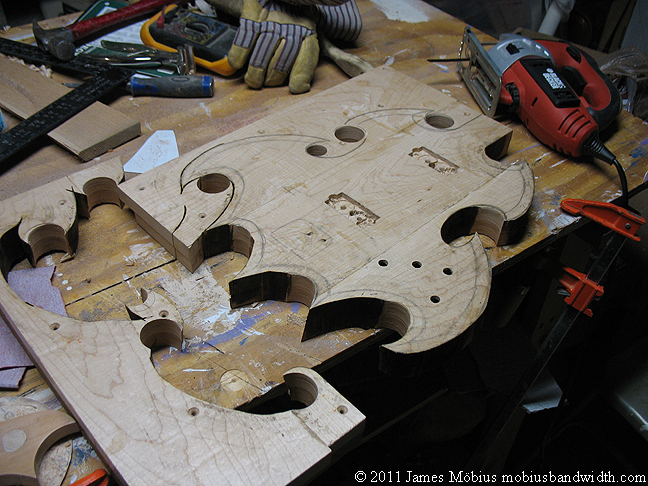
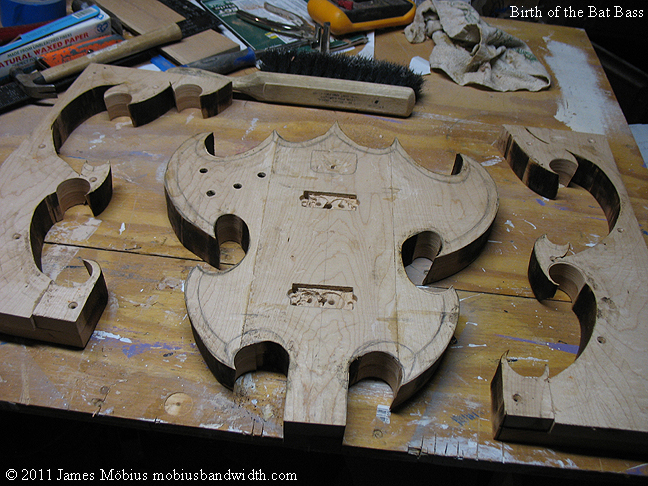
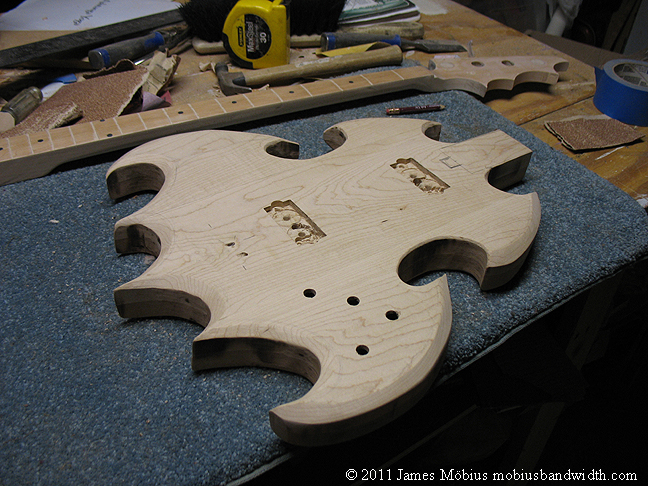
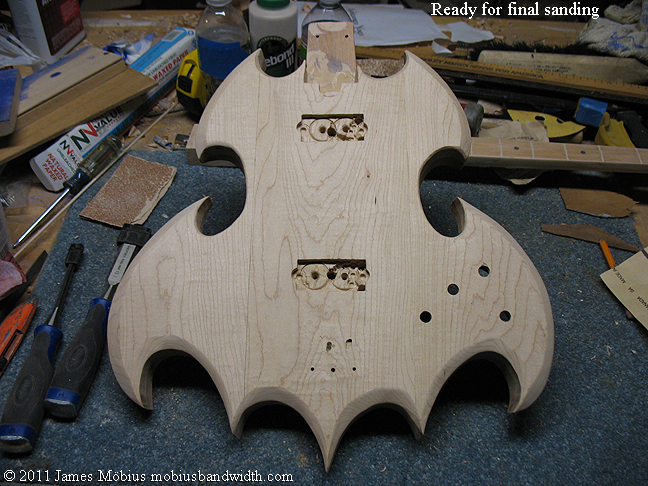
to get nice inner curves I drilled through the body in several places, you can see the glue job came out ok in pic 54, as I paused halfway through the body. The maple took some muscle to get through, being a hardwood, the mahogany cuts like butter by comparison. Took quite a while to jigsaw the outline, the scraps make some interesting abstract art. The wood was smoking, and burned quite a bit, the normal thing to do is sand the hell out of it, but I sort of like the look of it, I'm going to sand til I get it the shape I want, but if there are still burn marks showing, I'm going to leave them, not out of laziness, but as an aesthetic choice.
maybe I should save the scraps for the interior of a hard shell case, I did that with the Red fretless I built, I never really use that case though, but this bass is going to be a bit fragile on the bottom end, those thin pointy batwing tips might not fare that well in a gig bag without extra padding at the bottom.
 |
 |
 |
 |
 |
 |
 |
 |
Next to do, sanding, more sanding, and more sanding still. Sandman bass indeed! lol. I still have to buy a capacitor for the tone circuit, and a hunk of brass to mill into an extra tall nut. Still also have to make a block to raise the bridge with, I'll use some left over maple for that I think, predrill and countersink for the screws for the access plates. I will probably attach the neck, the nut and the bridge, along with the tuners, before I stain and finish it, so I can get it working mechanically, then once I'm satisfied that it plays well, take it apart again, stain and finish it, reassemble it and solder the wiring together. Once it's done I'll make and post a demo video of it in action. can't wait!!!
 |
 |
 |
 |
 |
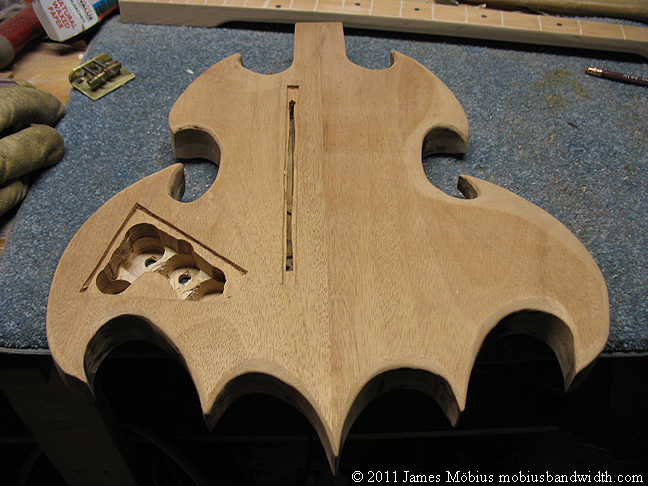
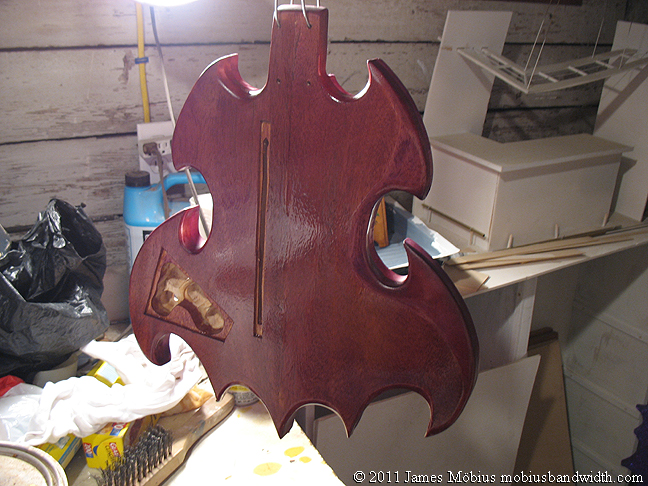
In theory I could change the scale of this instrument, I could paint over the fretboard entirely and paint on fretmarkers in different positions, but I won't. the body isn't perfectly symmetrical, and the fin-points have some varation from one to the next, I am ok with that, I was not going for something that looked like it came off an assembly line, I like a hand-made touch on my art. It was made by a pair of hands, not a robot. Even if I did use power tools, any flaws are due to the human factor, and give it more character. Picture 63 above shows the back view with the belly-cut, a deep upper bevel found on Fender basses and guitars, designed to accomodate the rib cage more comfortably than a flat hunk of wood would.
I went to Home Depot tonight to look for a hunk of brass, or something brass I could reshape into a nut, no luck there, also not impressed by the choices of colour wood stain. I did buy a little kit of Dremel sanding attachments, the wrong size as it turned out. Then I went to Radio Shack, where they did not have any .05 microfarad capacitors, shocking I know. Almost bought some wire, but I didn't like the colour selection, and the wires will be visible through the access panel covers. I know I have a spool of purple wire somewhere but I don't want to use all one colour wire.
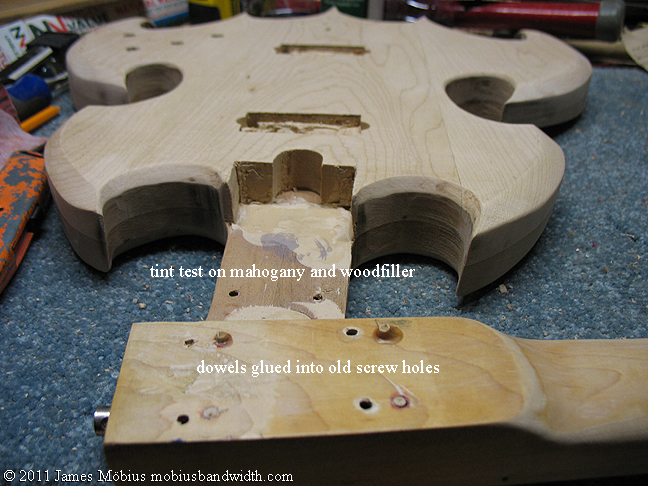
3-11-11 update. Routed the neck join, my crappy router, the one that isn't trying to kill me, slipped while I was routing and consequently I have a little bit of space to fill, but it's not that bad. I know in the past I have re-used necks, looking at one right now, my bouzouki, and I was somehow able to calculate the location of the holes, there are already holes for the mounting screws in the neck, and a chrome plate, I don't remember exactly what I did before, thought I used graphite or a wax pencil, tried rubbing a red wax pencil in the holes, alligning the tenon and compressing it to mark the locations for the holes, that was almost but not quite, entirely a waste of time. No, actually it was a complete waste of time. just like these last 2 sentences. Sorry! Graphite fared no better, I could try measuring but there are too many variables, and no room for error, so this time I decided to just make a new set of holes, it ended up offering me an advantage anyway, I was able to move the neck plate further down towards the bridge, and thus shave off and angle more of the heel. I'll just fill the old holes in with wood filler or something.
I don't like to move screw holes a small distance, it compromises the structural integrity of the wood, but sometimes I have to do that, usually for a strike plate on someone's door, you can take a chop stick, whittle it down a little, dip it in glue, jam it in the old screw hole snip off the end and let it dry, then you can shave it down and you basically have new wood and can reasonably put a screw anywhere you want, even if it's barely an 8th of an inch from where it had been. In this case I have plenty of distance, filling the holes is practically just a formality.
Actually drilling and positioning the new holes was still tricky, I drew 2 lines with a 3' wooden ruler on the face of the bass, alligning them with the neck in a centered position, then clamped the neck in place very carefully, flipped it over and drove a screw through by hand just enough to mark the spot for the first one, pausing to check and recheck my neck allignment several times to make sure the clamp hadn't slipped. Once I had that, I took the neck off, predrilled that hole a little, put the screw plate on and drove the first screw through halfway, clamped the neck back on and was then able to pre-drill the other holes. Checked, double checked and triple checked the neck's position before drilling. That care paid off, it worked nicely.

|
|
|
|
|
|
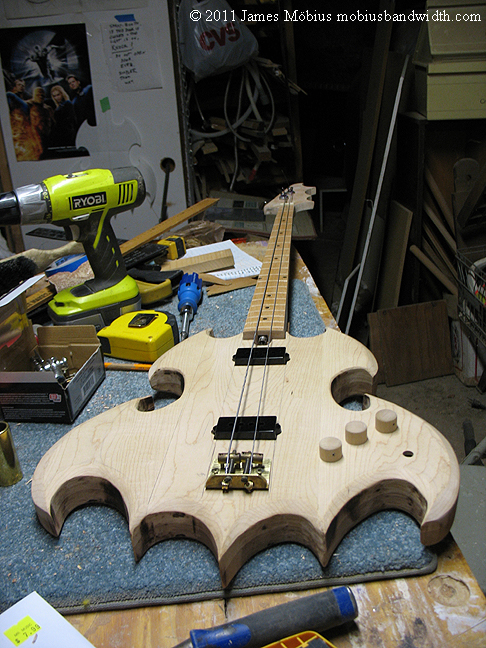
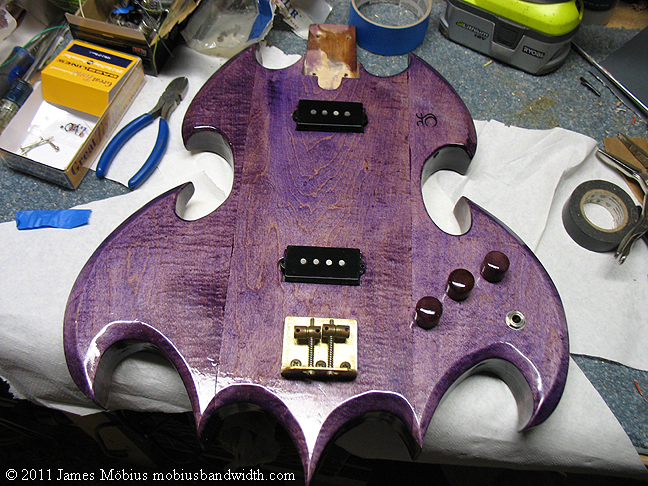
I put the bridge on initially with just the centre screw, put the tuners on, and strung it up to get the bridge position right, then popped 2 more screws in, the original nut (cracked down to the percentage I needed) and was actually able to play it as a fretless! Quite thrilling to finally be able to play this thing! Proof of concept. I was sad to have to take it apart, but having proved that it mechanically works, I can now continue sanding, finishing and wiring it. Next time I put strings on it I will be able to actually plug it in and crank it up!
Next I took all the hardware off and the neck, glopped some wood-filler on the join where there are dips. Next; still have to find a .05 microfarad capacitor, I think I might just use a .047, they have those at Mr Music, it's close enough. Also some wire, have to make a maple block to raise the bridge up 1/4" and then there's the nut to deal with. Found some brass at my local hardware store today, tall enough, but too thin, and I don't want to fuss with screwing it together, I want one hunk of brass to shape. Toying with just making a block of maple and using the original cheap plastic nut for now. I really can't wait to plug this beastie in.
3-12-11 update; did some sanding today, exciting! Dusted off (literally) my Woodburst stain, did a test on some maple with the purple, but it's way too pale and didn't really seem to absorb into the wood particularly well. Will have to look into other options. Also cut a block of oak to go under the bridge, tried to use maple but the hunk I had left over was too small to safely mill on my table saw. I guess it's back to Rockler to see what they have for stain. also I need a good rasp or 2.
Managed to work on my bass without touching it, from 2 flights up, online! researched wood stains, after googling a bit and looking at several hard to navigate sites that made me click way too many things to find what I was looking for, I found this awesome stuff:

-and Rockler carries it! No waiting! Thank Zarquon! Also learned the difference between stain and dyes for wood, thanks to Rockler's site, Stains sit on the surface (like the woodburst stuff that wasn't going to work for this project), dyes are absorbed into the wood, so you can get a transparent colour. By gum! I'm going to refinish my red bass, I originally stained it by mixing red acrylic paint with stain to try to get a transparent finish, I was never happy with it though. Blimey that's going to be a lot of work, taking it apart, removing the guts, everything, sanding off the finish, well, it's on the to-do list, just not at the very top. They have a red that's exactly what I originally envisioned, 27 years ago.
3-16-11 update; More sanding adventures!
I did some more shaping, very sublte corrections mostly on the inner curves of the cutaways, with my dremel tool, bought the right sized sandpaper tubes for it, turned the speed down (figured out how to change the bleedin' sandpaper thingies, remove metal core first), getting good at delicate work with that thing. Also went out and bought a measuring cup and some measuring spoons so I could experiment with pigment. The dye I bought has to be thinned with denatured alcohol or water, 1 ounce of dye to 1 quart of water, I was advised alcohol would not raise the grain, and therefore not create a need for more sanding, something I'm always keen to avoid. I learned that there are 6 teaspoons in an ounce, and 32 ounces in a quart, did some math and made 2 small batches (4.Oz each) of dye and tested them out on some maple scraps. (The mahogany, I don't really expect to show the colour that well, but it's on the back so I don't care).
One of the batches I used the ratio formula suggested on the bottle, the other had twice as much dye in it. Not really sure which is better because I kind of went over the first one more I think, and rather than using a brush, I used some super cheap non absorbent paper towels, (real scientific I know), but it seemed really too blue, I like my purple to lean slightly more towards the red end of the spectrum, than blue. On one piece went over it with more dye and it seemed less blue, possibly because it was wet, but it will look wet when finished, so I did a finish test with some poly to see how that looks. Decided to let the dye samples dry overnight first just to be safe. It's still too blue, I am going to buy some red stain, I want some anyway for future projects, and try mixing it into the bluish purple. I do not want a blue bass, I want a purple bass.
I also glued doweling into the original screw holes in the neck, didn't really use enough glue, even though it seemed overflowing, when I cut them off I saw gaps, so, lesson learned, use more glue. also had to put some woodfiller in the neck pocket where the router sank and dug it up a bit. Used that as a test to see how the woodfiller takes the dye, since I am thinking of dying the entire neck and fretboard, and filled in the fret channels with it. Looks like that should work. I used some woodfiller designed for floors because it's hardy, and I had some left over from another project. I'm now ready to do the last phase of sanding, a little minor reshaping, then work my way up to 220 grit sandpaper, that's smooth enough for me, it's going to have to be sanded again during the finishing phase anyway, much of it feels glass smooth already. I used the Dremel to get most of the blade burn marks off, and discovered the Dremel's sanding wheel will actually burn the mahogany and even the maple if you run it too fast with rough or even medium grit sandpaper. I'm learning a lot on this project which will make the next one go a lot smoother, and I'm inspired by the high level luthiers I'm talking to on the forums at Talkbass.com.
 |
 |
 |
 |
 |
 |
On that site, I discovered my design is rather similar to an infamous legendary bass known as the Mothman bass, which seems possibly to be cursed. Some people are suggesting this design is simply too evil and I should not finish the project, but I'm confident the good vibes of my intent in building it, ie; learning to play the music of the late Mark Sandman and Morphine, and then composing my own songs on this thing, is going to generate enough good karma to protect me from the Mothman bass curse.
And now here is a handy chart for mixing wood dye. Trans Tint dye suggests a formula of one ounce of dye per quart of transport medium (water or denatured alcohol), but adds that like tea, you can brew it to your own tastes. To make small batches to test out refer to these ratios, bearing in mind there are 6 teaspoons in one ounce, and 32 ounces in one quart.
Dye Dye Alcohol
in Oz in Teaspoons in Oz
1 6 32
1/2 3 16
1/4 1.5 8
1/8th 3/4 4
So to make my small test batches I mixed 3/4 of a teaspoon of dye (and you can buy a measuring spoon that holds that small an amount), into 4 Oz of alcohol. I labeled each bottle I made of dye so I'd know later what it was, I can add more pigment to it if I want and won't lose track. I also wrote down on my scrap wood samples, what was what so later when it dried I'd know the results of my incredibly scientific experiment. This proves that as a musician, I can't live without alcohol. lol. Actually, that was true before, I used it to clean the heads on my old tape decks, which I still do. Other than that I have no use for it, (except in tattooing of course, for cleaning tubes before changing ink colours.) Buy a set of measuring spoons and a measuring cup at your local supermarket, I paid under $5 for these things, as the dye is poisonous and you don't want to use the ones from your kitchen.
Stay tuned for more adventures, and science!
3-19-11 update; Yet more sanding adventures! And dye-ing nightmares!
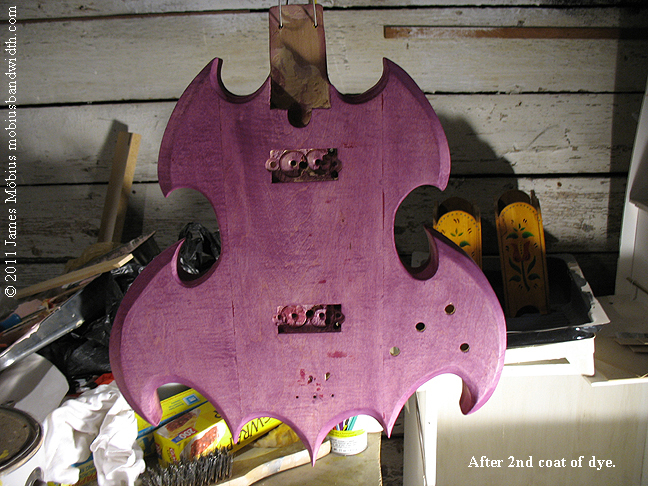
Went to Rockler today, got a good parking spot out front, minutes before they closed, but had no quarters for the meter, took a chance (did not get a ticket!) ran in, bought the last bottle of red Trans-tint dye they had, which for some reason they only charged me $17 for and some change, wasn't going to complain, seemed like good omens. Alas... I spent probably over 2 hours hand sanding the body with 50 grit, 100 grit, 180 grit, and finally 220 grit sandpaper, working out the last bits of unacceptable rough spots, and started experimenting with dye again.
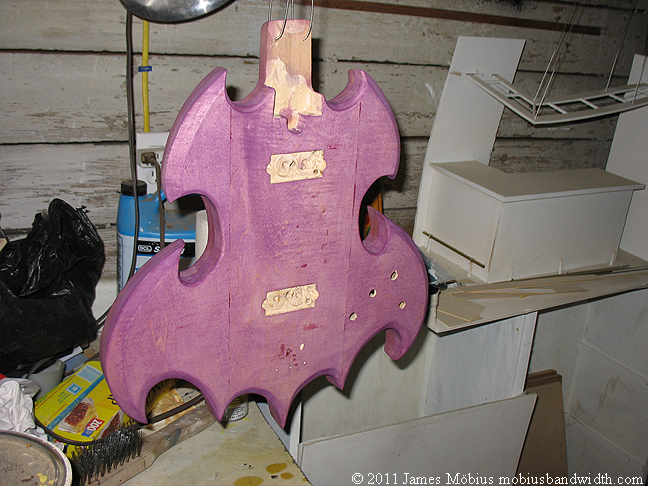
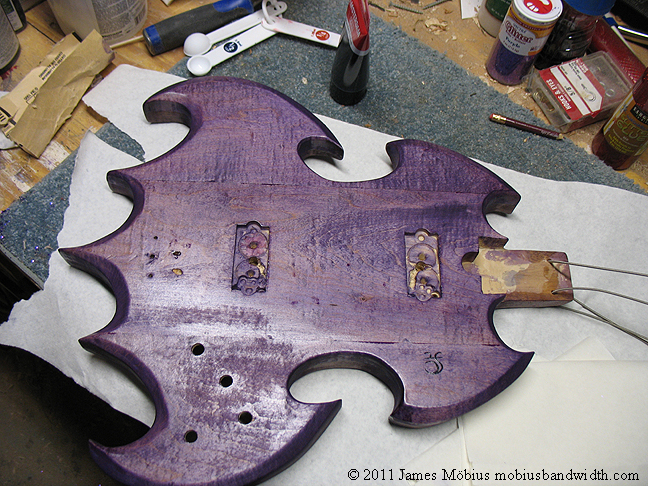
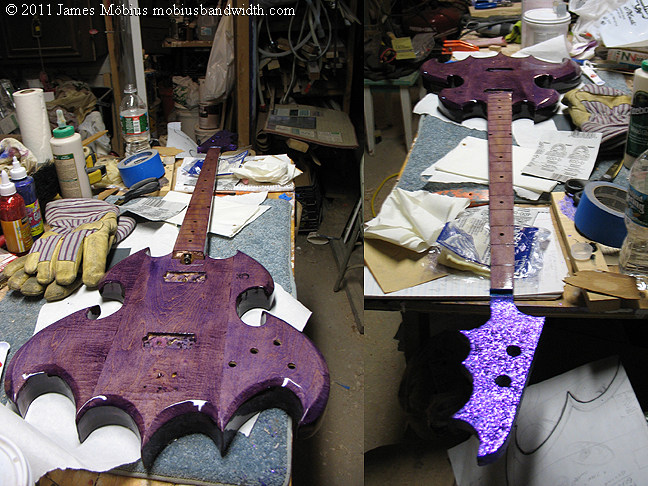
I did a few more experiments, mixing in some red, then mixing different batches together, keeping good notes about the content of each batch even as I merged batches and renumbered them, I finally got a shade of purple I could live with, and successfully made 2 matching batches of it of 2.6 ounces each, mixed those together and started applying the dye. first I hit the neck, I had been worried that the wood filler in the fret slots might not take the dye too well, no worries there, it's the maple that was not behaving. Apparently the finish on the neck really soaked in deep, and the dye only really took where I sanded the hell out of it, so looks like I have some more sanding to do on that. I am definitely painting the headstock front and back black, and trimming it in glittery red I've decided, it'll hide the plugs in the no longer needed tuning machine holes, I really don't want this to look like a conversion job.
I suspended the body with some metal wire, picture hanging wire, I thought, started dying the body, and the wire started to break, so I had to hastily (in yet another race against time!) think of something. I rolled out some papertowels on the bench to protect the body from picking up dust, and replaced the crappy steel wire with an old bass string! Those things are great for hanging pictures, and in this case, hanging the bass. Then I got back to dying it, the mahogany really looks like purple heart with this dye on it! Good to know. The maple, looks a bit pink, but I think I'll try putting another coat on it tomorrow, might first test on one of my scraps, I might make a batch that's more blue-ish and give it a ratio favouring alcohol more than dye so it's thinner. we'll see.
 |
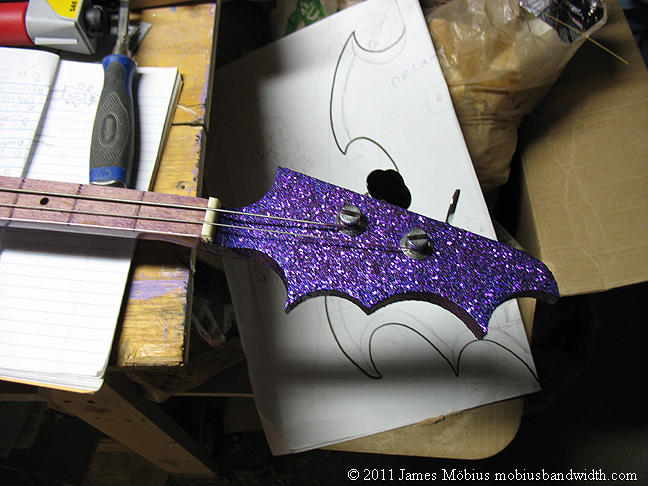
3-20-11 update; Today, I went to Central square, where there's an art supply store, hoping to find a block of brass and some red glitter paint. No luck on the brass, I have pretty much given up on finding a hunk of it, and now plan to make a small maple block to mount a brass nut blank onto, for the time being, we'll see how that goes. I could just make the whole thing out of some very hard wood I suppose. Glitter glue, not paint, was on sale, I looked at the red, it seemed pretty orangey, except compared to the bottle of orange, the bottle of purple really caught my eye though, and I started thinking, do I really want the headstock to be black with a red outline? That's a cute idea and an homage to the TV batmobile of my youth, but I don't want this to be "the Batman bass", this is the Bat Bass. I bought a bottle of red, and a bottle of purple, I figure I'll need the red eventually for the red guitar I'm going to make at some point. The headstock, I have decided, will be faced with purple glitter glue, for a hopefully 1960's vibe.
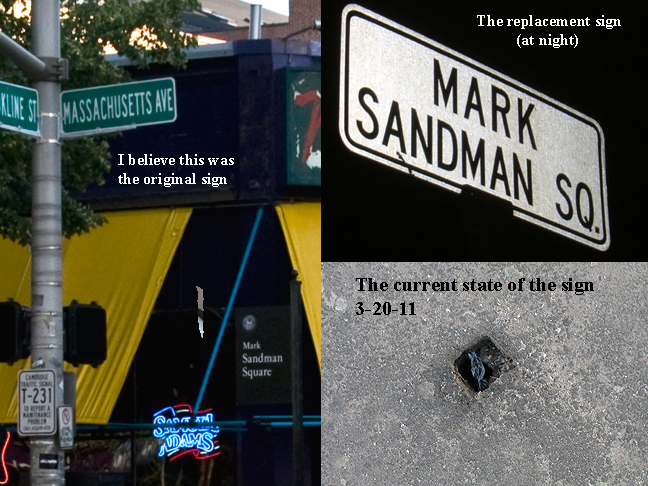
While in Central square, I thought, why not trot down the block to take a photo of the sign at Mark Sandman square? I recall not seeing it last time I was there, it was not there today. Instead there is a square hole in the ground in front of the Middle East club where he frequented, where the post was. I hope it will be restored soon, there have been at least 2, so presumably some asshole stole it. Way to go Morphine fan. How do you sleep?
From there I went to a cast meeting (I do theatrical lighting), where someone asked me if I could make him an acoustic bass, I said, I'm not quite there yet, sorry. I could make a chambered electric bass, but not a genuine acoustic instrument. my shop just isn't set up for that yet. Something I should look into though, why not? Hmm, he did say he was thinking about a coffin shaped bass, that I could do, no wood bending...
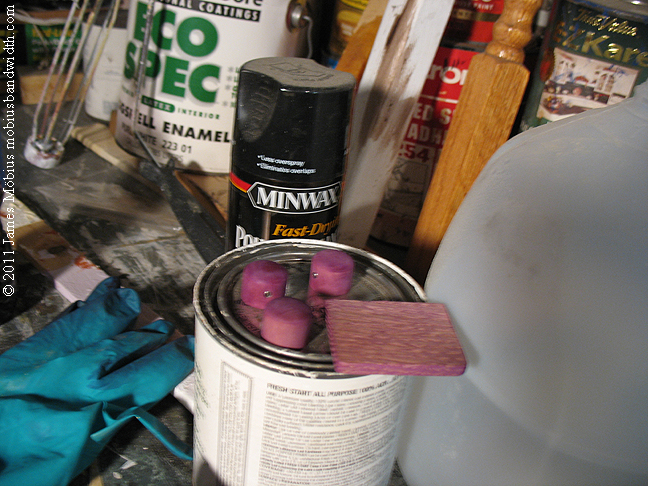
When I got home, I sanded the neck more, in the morning I had added some woodfiller to a couple of spots, used an electric sander to try to get more of the original finish off the back of the neck, the fingerboard and the back of the headstock, no need to sand the front of it more since I've decided to paint it. Then I restained it, the fingerboard is still not really taking the stain that well, I don't know if I really want to sand it that much more though, I'll see how it looks tomorrow. Also made a detailed list of what's left to do, kept thinking there was something I'd forgotten, looked in the bag of parts and realised I hadn't stained the knobs yet! So I did that, and made a note I need to do a test countersinking on some plexiglass to see if I can use wood screws or if I'll have to use some pan heads for the rear plates.
 |
 |
 |
 |
 |
The small oak block next to the boxwood knob covers is going under the bridge to raise it up. Not completely sure I'll need that, but I suspect I will. Decided the headstock will say "Mobius" on it, and below that "Bat Bass", with my insignia near the end, and I might put a graphic pic of Mark's face on the back of it, from the cover to the Sandbox album that was released posthumously. Still haven't decided what if anything to put on the fretboard, maybe "Sandman" possibly in Hebrew, Or runes. Hmm, maybe in Ugaritic. the oldest written semitic language, cuneiform, one of the 10 languages my Grandfather knew. Not exactly in wide use.
3-21-11
Bought some capacitors today, .047 microfarad, close enough, and a bone saddle that looks maybe tall enough for the nut. Nervous about trying to shape it, but there's plenty of it if it cracks or something. Not sure what I'm going to use to finish it. Tempted to use a spray product, paranoid about drips and runs. Also lazy. What should I use?
Also nearly died on the highway today, glad I didn't. Slush = bad.
Posted a pic of the bass on one of my art forum accounts the other night, got some nice comments, one ridiculously nice, could turn into a commission bass. Someone wants a 4 string fretted non slide bass version, matte black. maybe I could do the red trim on the headstock for that, he draws comics. Of course I'd have to figure out how long it took to make to estimate what I should charge to make one. Next one would go faster obviously since I just made one, and that finish could be sprayed on easily. 3-24-11 update
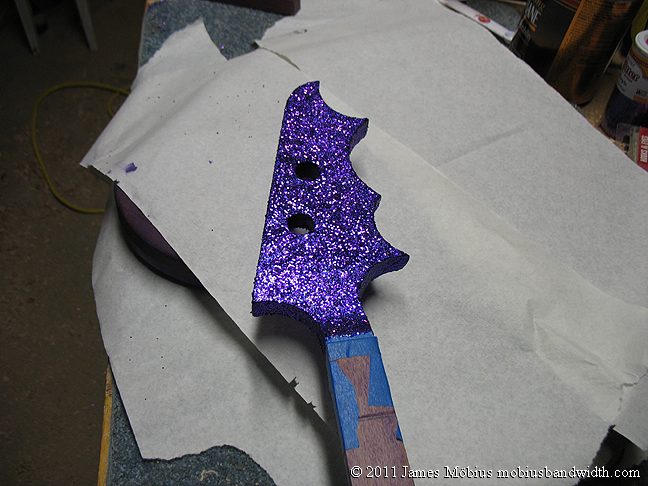
Haven't had a lot of time to work on the bass, did some tests with the glitter glue on wood, unstained wood, the wood shows through way too much, stained, it's still not purple enough, so I'll have to paint the headstock purple, probably metallic, first, then brush on the glitter glue, which comes out of the bottle like toothpaste and has to be flattened. then I'll paint the text on top, and my insignia, by hand, with a fine brush, not going to use decals, they probably wouldn't look good on the semi rough surface anyway. Off to see Stanley Clarke and Victor w00ten tonight!
I painted the headstock metallic purple, (pictures looked remarkably blue, and not at all true to life on the camera's display screen), first just the back and front, but I got some paint on the edge, and the edge looked really shoddy compared to the rest of the head so I mixed up some more to paint the edge. That batch was a little darker, so I ended up with a bit of dark trim on the face, which I wanted originally anyway, though it was going to be red on black. Then I did a glitter glue test on a scrap of maple I'd used as a pallete to mix the metallic purple (purple acrylic art paint mixed with some silver, makes a gorgeous metallic purple.) Seemed ok, but I realised the head needed a 2nd coat of paint first, because streaks in it where the wood showed through, would show through the glitter glue. So I did a 2nd coat, which was darker and lost my border, which would have been subtle anyway.
This stuff dries very fast, so before long I was able to start with the glitter glue, I put some on and used a 2" foam brush to spread it around, and the result was not good enough. Uneven distribution of glitter, when the light hit it it looked ok, since it was all metallic anyway, but when the light didn't hit it, the glitter looked like dark spots, peppering the head. I realised I would actually have to buy some glitter after all. I went to CVS, a 2 minute walk, they had none. I walked to Staples, on a few minutes down the road, they also had none. They had a big pack of inexpensive glitter glue, and an art set, with 3 bottles of glitter in it, silver, multicoloured, and gold, which was leaking all over the place, including onto me.
I'll have to go back to Central square to the art store. And shell out $5-ish for some. Live and learn, as the saying goes. I think I will use the glitter glue, and then sprinkle glitter onto it. Between the 2 sources that ought to be enough, one hopes. Maybe I won't put it on the edges. The metallic purple paint looks pretty nice by itself.
next: a trip to Rockler to look at the locally available wood finishing project options. Hoping to find something like Bartley's Gel, that I can rub on and buff, and get a high gloss finish. Does that exist? I dunno. Gonna find out.
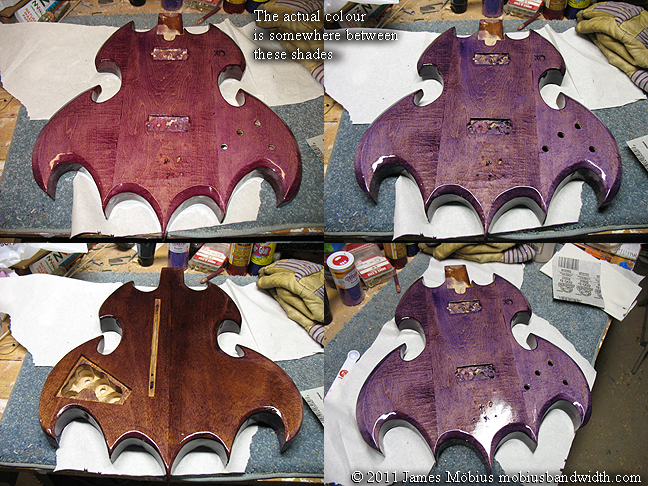
3-25-11 Went to Rockler, no one seems to make something you can just rub into wood and get a high gloss finish, so I bought some brush-on poly, also a block of purple heart I might use for the nut if the bone doesn't work out. In the workshop I put it on the dyed mahogany and noted they looked remarkably alike. (check out the pic below). Also stopped at the art store and got some purple glitter, a tiny half ounce container was over $5, but then I found a bottle with probably ten times as much for under $3, apparently the finer grain stuff is pricier, but I liked the colour of the cheap stuff better anyway so I got that.
Painted back on the missing neck marker dots, and little black lines on the fret edges, just on the top of the neck for a little extra visual clarity. Might add something else later to make the neck markers brighter if it seems like I need to, maybe glue on some little plastic gems or something, it's getting pretty blingy anyway! Can't really paint anything on the headstock now I think, it's got rather a lot of texture thanks to the not tiny glitter, so after much deliberation I painted my insignia on the body on the lower cutaway horn. Also sanded off some glue that was picking up too much stain and restained in a few spots. Another coat of dye didn't really seem to have an impact (and it sands off fairly easily for something that's supposed to soak into the wood), but I did one anyway after seeing how much nicer the sample at Rockler looked than my bass does. :/ Oh well, once it's done I'm sure I won't care, maybe with poly on it it'll look better. I don't think I can endorse Trans-tint wood dyes. Should I have used water instead? I have not gotten the results they show.
At this point I am ready to start finishing the wood, scary to think I could actually be playing this thing in a matter of days! (oh optimism...) Off to teach a guitar lesson!
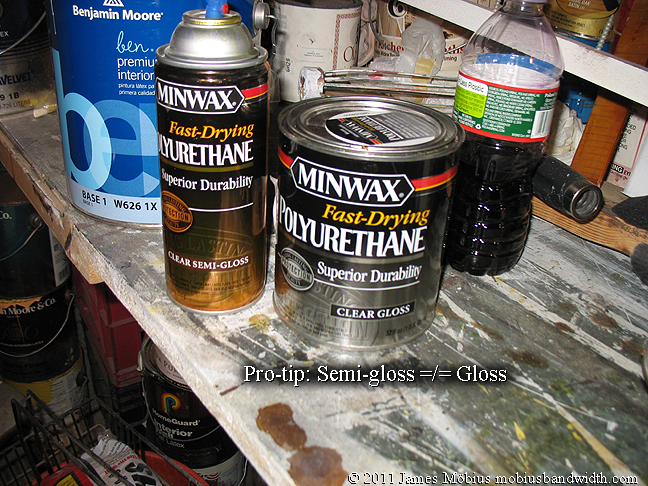
Later that same day, Decided to finally start finishing this bloody thing, and was about to, when I noticed glitter in the black sponge brush I'd used for the glue, I'd washed it out, but there was still some glitter in there, and I don't want it where I didn't put it, so I thought, I'll have to pour some poly into a separate container just to use on the headstock, when I spotted the spray can of the same stuff I just bought a quart of, not a lot left, but enough to start, so I sprayed the neck with that. A few days later I realised the spray can was in fact semi-gloss, not gloss. Bloody hell. Well, it's not that bad.
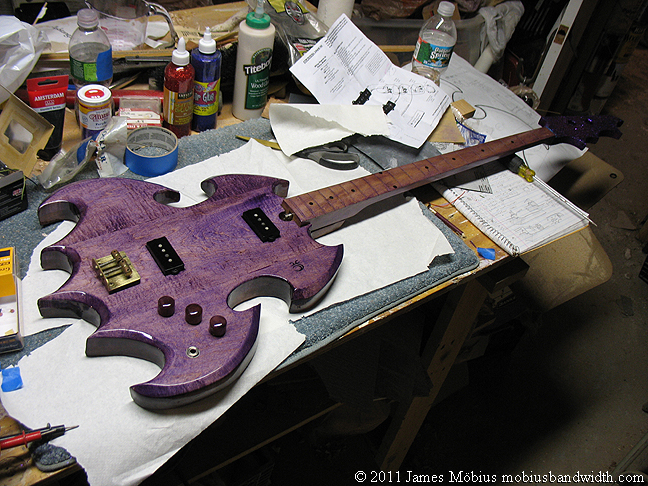
Then I was about to start brushing on the knobs, when I realised I wasn't sure how to hold them without touching the surface that had been brushed, I needed a board with at least 3 nails or screws going through it that I could set them on whilst finishing them. Then I spotted one, I forgot I had made for finishing some ballusters I'd restored for someone's house. Good to be a handyman if you're going to be a luthier! So I set them on that and finished them, and the bridge block, and set upon the body itself. It was a little hairy, there was some dripping, also when I sprayed the neck it seemed like the dye was actually running a little in a spot or 2, which was rather disturbing, but this didn't seem to be a huge problem. I kept after the drips and runs with the sponge brush (a new one sans glitter), and a gloved finger. The maple absolutely sucked in the poly, there were areas that were literally dry to the touch in a matter of minutes, tho the mahogany was still quite shiny, so it looks like the maple side will probably need more coats than the mahogany.
 |
 |
 |
 |
 |
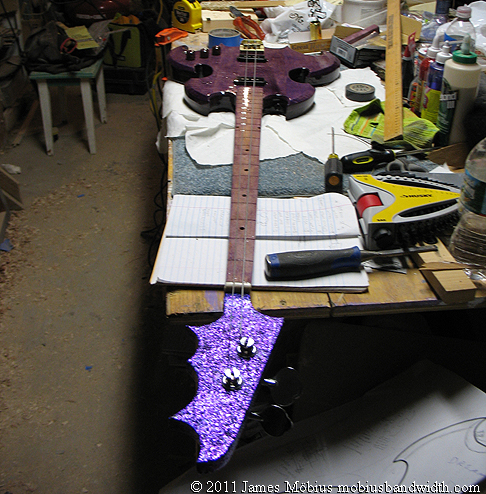
whatever today is, Last Sunday. 4th coat of poly on it. I suspect it'll need one more, probably should be sprayed on. Managed to hang it upside down from the previous orientations, (via a wire coat hanger through the pickup / rear wire channel), for this coat, to spread the poly more evenly. The neck is almost done, but I'll probably need more on the head, it's so rough with the big glitter bits on it, I want to seal them really well so they don't flake off. (I think I have 7 coats on there at this point, still not exactly smooth, but nothing will flake off, that's for sure!) The back of the body seems much rougher, not actually rough, but not flat, it's textured, the mahogany must have reacted with the poly somehow, it's like oak now back there, but not too bad. The whole thing is so shiny, I am happy I went with high gloss. It's going to be an interesting look when it's done.
My guitarist wore a lot of the finish off the back of the neck of his les paul, and had it refinished, with a glossy clear finish, the guy offered to restain it to restore the colour, but he opted not to do that, and was happy with that look, distressed, antiqued, call it what you will, it's like wrinkles, you earned them, wear them with pride. the back of the neck of this bass is going to look similar to that, and the body, I really won't know til it's done, but I suspect it will look fairly vintage and faded, which is more interesting than if it looked like something off the assembly line from guitar center.
also dug up my old acoustic nylon string to lend to a friend, only to find the bridge had popped of, so I glued it and clamped it, -a little too hard as it turns out, heard something crack inside, one of the inner strut thingies broke off, very clean break though should be able to glue it back in place, I'll need my dental mirror and light though to see where the heck it goes. Not tons of fun there. I'll have to cut a block to reverse clamp it inside or something, probably. Also helped my drummer set up his studio, mac with pro-tools, new nice speakers, going to be cool! (I hate macs tho).
4-1-11 more photos at last.
Hello again, I've been having some adventures, I haven't been blogging, but hopefully looking at the photos I have been taking will jog the ol' memory banks and I can blather on about what's been going on in the lab.
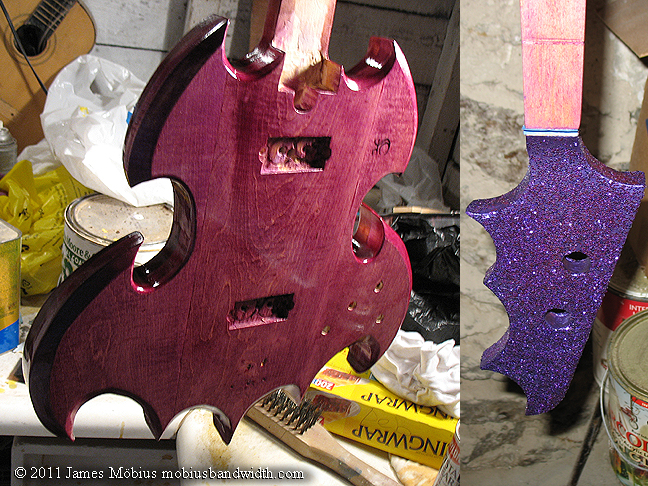
The flourescent light over my workbench made the dye look very blue-ish, the incandescent lights in my spray booth made it look like a pink-magenta, I had no idea what colour it really was for a bit. So I continued to apply poly with a foam brush, I think it's five coats at this point. you can see the maple absorbed the dye in a slightly non uniform way, as is its wont, but it's wood, a natural product, so if you want uniformity, try plastic or metal.
While working on it, I was frustrated at the way it was looking, but now I genuinely love the way it looks, which just goes to show. What does it just go to show? That you oughtn't worry, I suppose. Or I oughtn't anyway, things always work out for me. Picture 92 which has 4 views, I think the bluer ones were taken with the flash, or maybe without it. oh well. In picture 95 you can see the plexiglass rear access panels test fitted, while countersinking the screw holes I cracked the corner off of the original guts chamber panel cover, but fortunately I have pleny of plexiglass still left over from some window repair job I did, the new one is smaller and easier to remove anyway, and I changed my mind about the location of one of the screws.
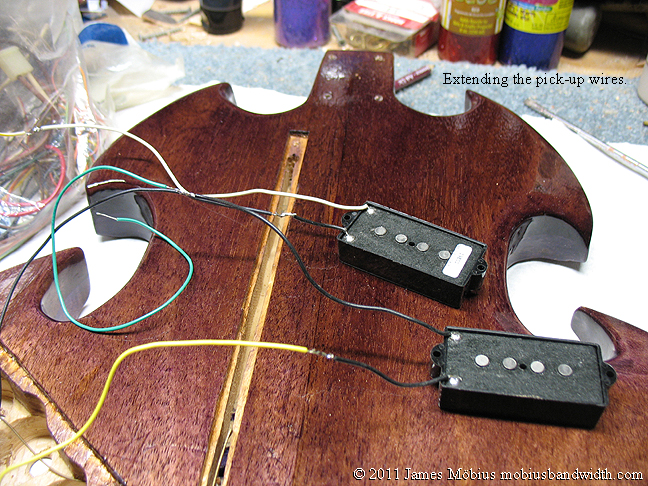
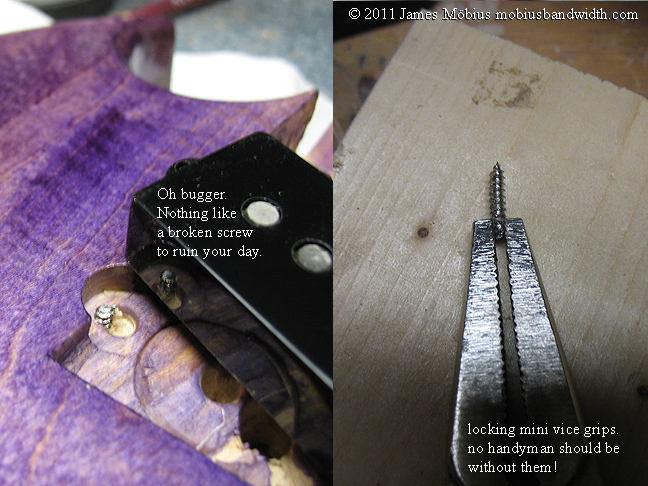
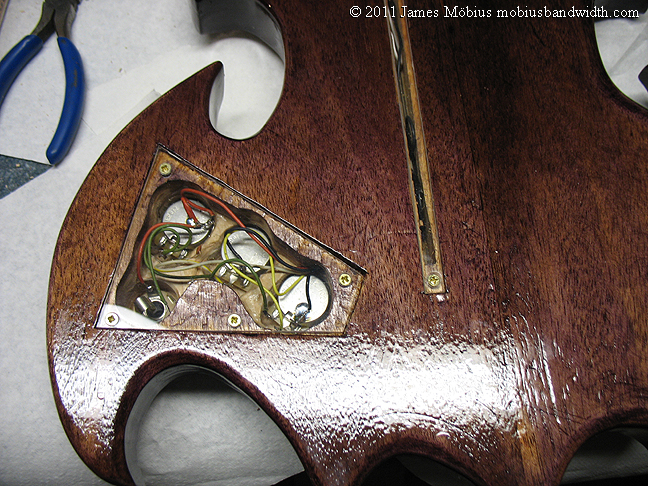
Then I started wiring things up, I had to extend the length of the pick-up wires, although I ended up removing the green extension wire on one of them, as once in place, it reached the potentiometer I had to solder it to, but the extra length made fishing it through the inner channel easier, so no regrets there. Then I got the bright idea to screw the pickups in place, the screws that came with them however had ideas of their own, including not having the tensile strength to bore through maple, even when I'd predrilled for them, and the first one snapped off in the hole. There wasn't enough sticking up to wrench it out with vice grips, so I had to drill around it a little to give it enough wiggle room to get it out. This reminded me of a very valuable lesson I learned in high school wood-shop 27 years ago when building my first home made bass, I was screwing a neck screw in and the head stripped out, couldn't drive it in further, and couldn't back it out. I thought I was sunk! my teacher came up with some pliers and carefully grabbing the head showed me how to spin it out.
I bought some brass screws to replace the original pick up screws, couldn't find exact duplicates at the hardware store, but I think the brass will look nice anyway.
Once I got the electronics wired up and soldered, I put the plates on, and realised from the back, it looks rather steampunk like that. I am definitely planning to make the plexiglass access panel covers a signature of my future projects. I've never seen it done before by anyone else, and I quite like it. the wires I used are old, and the green one has a really less than charming 1970's vibe to it, but somehow it's grown on me. except inasmuch as when I plugged it in, it produced only a hum, and no actual music. Sigh. have to open it up and look that over, might have flipped the pick up wires, I don't think I did, and I didn't think it would matter really, a pick up is just an AC signal right? my guitarist assured me it matters. I also might have been reading the schematic upside down, it was 2am by the time I finished that night. :/
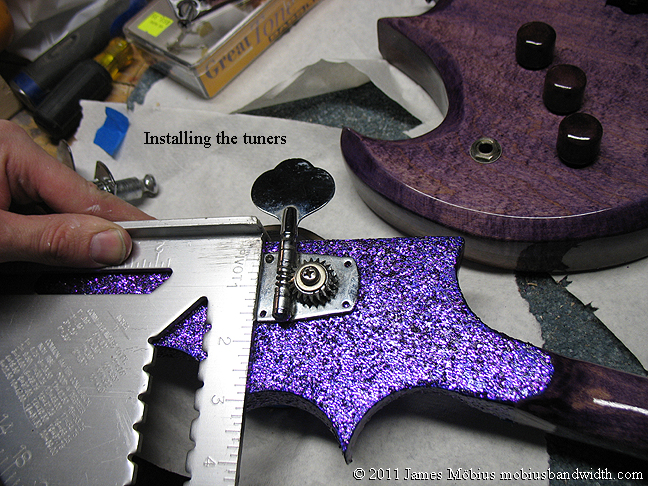
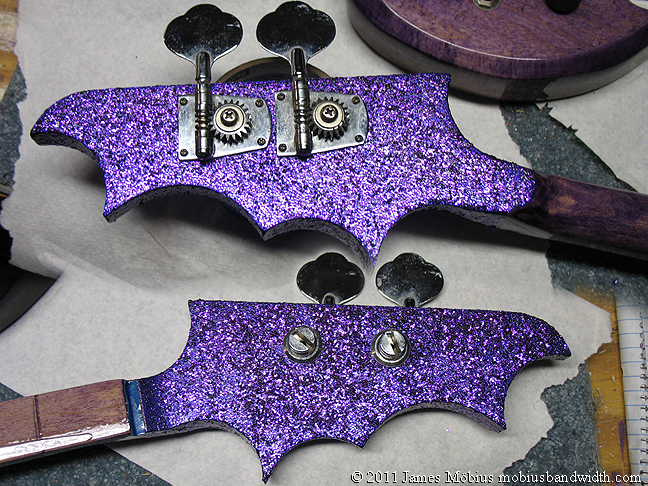
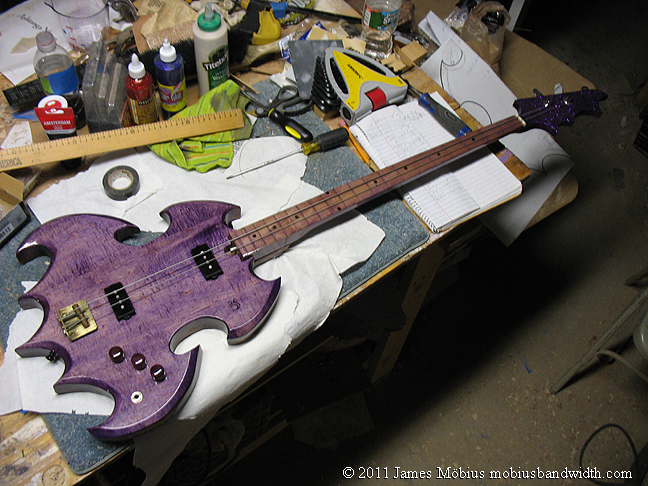
I installed the tuners, used a speed square to allign the one straight line perpendicularly to the top of the head, which helped me locate the original screw holes, on the first one, the 2nd one I just eye-balled off the first. Then I bolted the neck on. this actually took over 2 hours somehow, I used the original screws that came with the neck, but I had moved the holes, tho I predrilled, and they went through the soft mahogany with no problem, the edges of the thread weren't sharp enough to carve into the maple, so I had to really work to muscle them in, and kept having to pull them out and predrill the holes a tiny bit more. A very challenging not super fun experience on the whole, I had blisters on both hands from working the screwdriver carefully so as not to strip out the head. Also ultimately, after I got them all in and put the strap knobs on I realised I wanted to move the upper strap knob, and the best place for it in terms of balance, etc, was to replace one of the neck bolt plate screws with it, so I backed out that screw, dropped in a dowel to fill it, in 2 pieces, gluing only the top piece in, and put the strap knob there. A last minute innovative decision I'm quite happy with. Now I have to do something with the hole I originally made for the strap knob, in the curl of the upper cutaway/horn. I might glue a little gem in there or something.
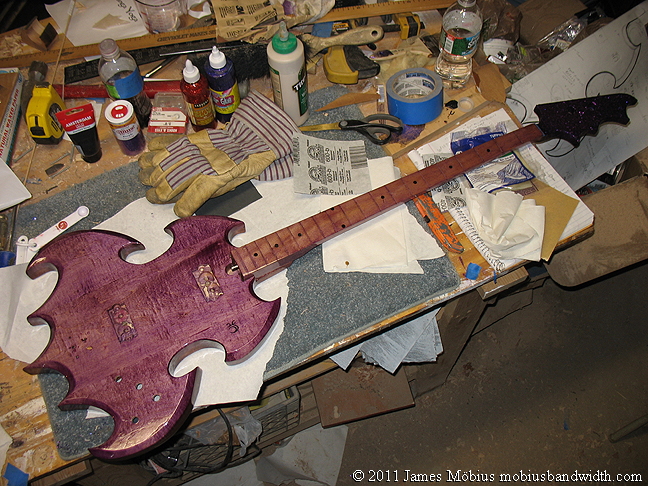
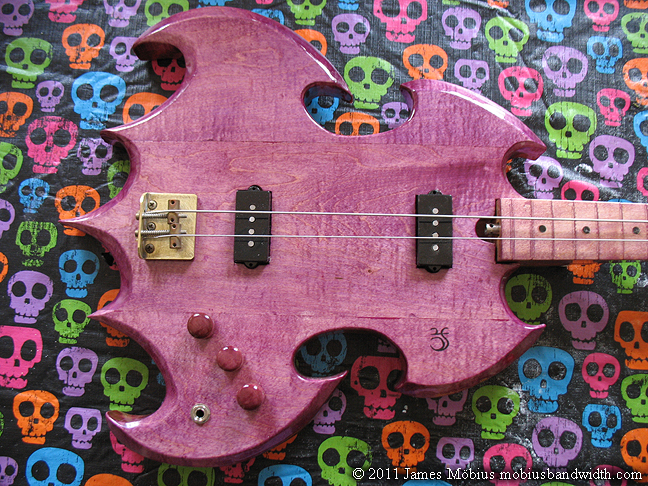
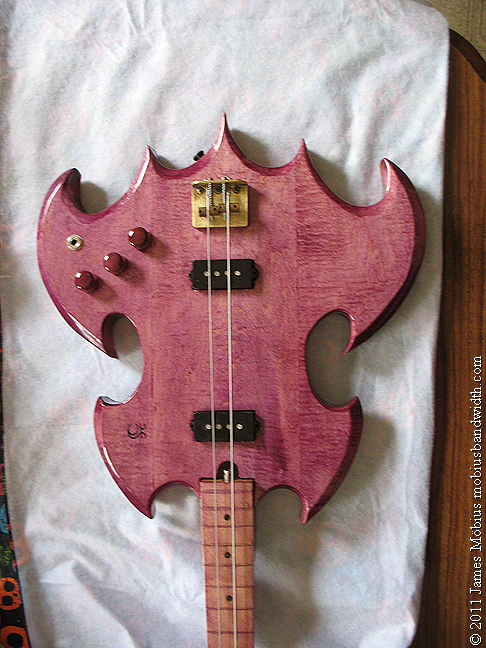
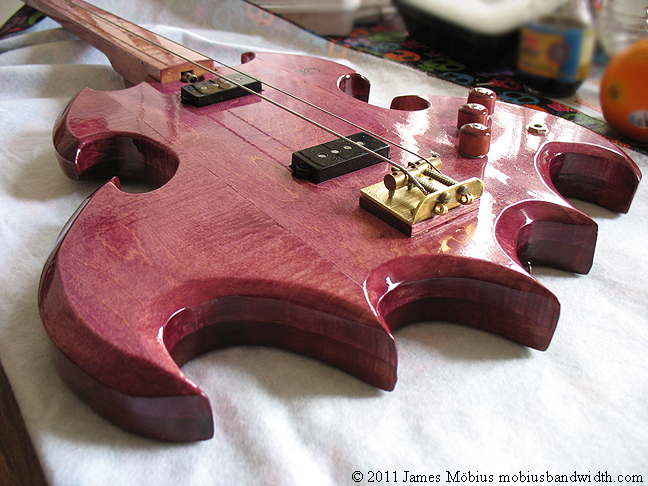
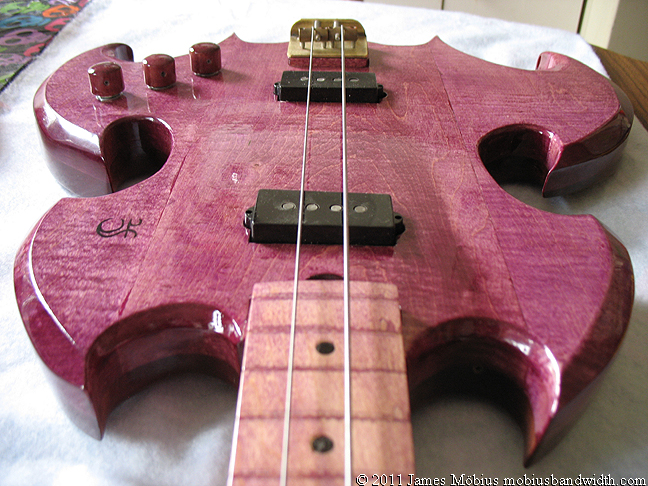
At this point, I can play it as a fretless bass, which is fun, but I already have 2 of those, with 5 strings, so the next phase is to make the nut, then decide if I have to raise the bridge at all, or can get away with lowering it, or should. once it's functioning mechanically as a slide bass, I can determine the pick-up height and deal with setting those where I need them, might have to actually make blocks to raise them up on, then I will re-wire it so I can actually plug it and play the bloody thing! There are also a couple of rough spots I think I will have to touch up with some actual high gloss poly spray. It's a slow process, and life gets in the way, but I'm getting there. I am really in love with it now, the body looks like a hunk of purple marble, especially on the edge, and wherever the grain shifts under the light like a sapphire. It really looks amazing in person, photos aren't doing it justice.
 |
 |
 |
 |
 |
 |
 |
 |
 |
 |
 |
 |
 |
 |
 |
 |
 |
 |
 |
 |
4-2-11 more photos.
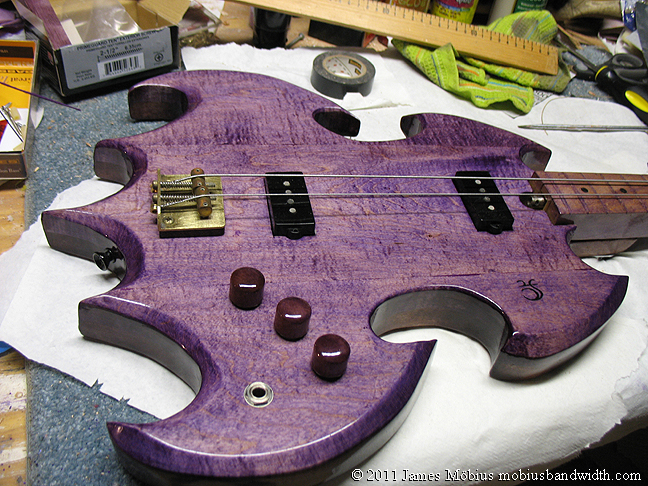
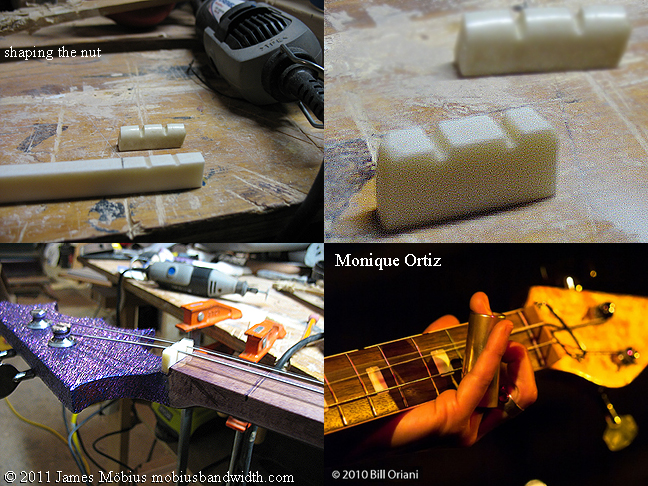
Made the nut today, and a disturbing discovery, the nut is made of bone, when I ground it, there was a terrifically unpleasant smell from the dust, which I recognised from visits to the dentist. That's what that awful smell is, my own bones being ground down! My next dental appointment will be even less fun now. I put on my respirator as the dust mask wasn't cutting it. Anyway, after playing it with the slide a bit, (fun!) I glued the nut in place, seems high enough, raised the saddles a little. I will definitely need to elevate the pickups, routing for them it turns out, was a complete waste of time, but good practice anyway, and I wouldn't have liked to do it after finishing the wood.
In the first pic here, you can see the nut coming to fruition, and a photo of Monique Ortiz's headstock looks like her action is set higher than mine, but the way I have it seems to be working. I don't have a string tree, haven't found one, might use a couple of eye-hook rings, if they seem necessary, the grooves in the nut are pretty deep and may be adequate to keep the strings from jumping around. I'll be happy if I don't have to drill 2 holes in the headstock.
Took it outside to get some sunlight photos, but the colour doesn't seem true in those, I need a new camera. It's not so magenta/pink looking in person. Then I brought it up to the kitchen, yes that's my table cloth, I know it's April, every day is Halloween in my house. When viewed "upside down" I think it looks like some fantasy Viking war axe, and not nearly so much like the Bat-signal, which admittedly, the bottom half of the body does resemble, somewhat.
 |
 |
 |
 |
 |
 |
 |
So, all that's left to do is figure out where I went wrong with the wiring, fill in that hole where I originally had the upper strap knob, possibly add string trees, and raise the pick ups, I've already drawn templates on the wood I'll be using for the blocks to go under the pickups, one of them is some lauan (1/4"+ plywood) that was on a door in my mum's house, probably for 50 years or more, hiding its colonial panels, back in the 50's people did that for a modern look. The blocks will just be painted black to match the pickup covers.
Midnight...
It's alive...It's ALIVE I TELL YOU! bwahahahahahaaaaaaa! oh yeah. So, seems I managed not to see, on the schematic, that the chassis of each potentiometer is in fact supposed to be grounded, that'd be why it wasn't working, and hummed when I didn't have a hand on the bridge, grounding it. Sometimes we can overlook something that's staring us in the face. I only plugged it in briefly, to the stereo in my workshop, then found some black plastic material basically constructed like cardboard, but as I say, plastic, fairly matte, at that, firm but with a little sponginess, which was the absolutely ideal stuff to stick under the pickups in lieu of springs, or the rubber tube springs that came with the pickups, which I could have used, but I needed something black under them anyway, so I set the pickups, predrilled and installed my brass screws, which look out of place on a pickup, they normally have silver screws, but it ties together with the bridge, visually.
I did not install any eye hooks to act as string trees, decided to play it a bit first and see if they seem necessary, and I have to say so far they don't. I brought it upstairs and played along, unplugged to several Morphine songs, I notice Buena is in a dropped C tuning, most of the songs are in D, with the thinner string up a 5th, except Whisper, which is up a flat 3rd. Those Hipshot detuners are seeming more appealing, tho it only took a moment to change the tuning really. Still, with 3 positions, they could cover the tunings for all the songs I played tonight, Honey white, Cure for pain, You speak my language, etc.
after the first song my pinkie was killing me, Mark played with a big heavy metal brass slide on his pinkie but I switched it to my ring finger and found that much more comfortable. I also wrap the finger in some paper towel or tissue to keep the slide in place, and the sweat down. Man that was fun, can't wait to plug this into my amp tomorrow morning! I also had to stop because the smell of outgassing polyurethane was irritating my throat. That bass stinks!
Watch this space for a few more updates, I'll shoot some video to demonstrate how it sounds, and there will be a few more photos showing the last details. and then? I have to finish fixing my very old acoustic guitar, it's still in the shop so I'll do that next, then finish the saddle on the bouzouki I made, and then, I will start on the next build, a standard tuned 6 string electric guitar, with a mahogany neck, salvaged from Jon Karr's old Guild SG, about which there's a very interesting and bizarre story, explaining what happened to the rest of that guitar, stay tuned! hah, tuned. I kill me. hundreds of comedians out of work and I'm cracking jokes, I know...
Here is a little demo video to get an idea how this instruments sounds, music is a medley of Mark Sandman basslines, I'm still figuring them out, so they're not perfect.
I have started a project transcribing Morphine songs, and will be posting some of them on this page: Morphine transcriptions. there you can read a detailed tablature of basslines, with some video, I may shoot some instructional video as well.
Tattoo Portraiture Illustration Murals Paintings Digital photo-manipulations Luthiery 3-D works Sequential art Sketchbook Photography
![]()
![]()
![]()
![]()
![]()
![]()
![]()
![]()
![]()
![]()
![]()
![]()
![]()
![]()